

This guide shows you how to install an AI chatbot on your website. The steps depend on which product experience you use.
For new setups, we recommend AI Agent in Text. You configure it in the Text App, where it uses knowledge, instructions, customer context, and Skills to answer questions and take actions. The steps below focus on making your AI Agent available through the Text website widget.
If you already use the previous ChatBot.com Visual Builder and AI Assist workflow, it remains available. You can find those instructions later in this guide.
How to install AI Agent in Text using the website widget

Choose an installation method
Text supports several ways to add the website widget:
- React, Vue, or Angular — install the framework SDK package and add the Text widget directly to your application.
- HTML snippet — paste the generated JavaScript snippet into your website source or shared template.
- Google Tag Manager — create and publish the Text widget tag through your existing GTM account and container.
- Platform integration — follow the dedicated instructions for WordPress, Shopify, or Webflow.
Choose the method that matches how your website is built. Each website widget has its own setup and installation status in the Text App.
Install the widget in React, Vue, or Angular
Step 1: Open website widget settings
In the Text App, go to Settings → Channels → Website widgets. Select + New website widget if you already have another website connected.
Step 2: Enter your website URL
Enter the address of the website where you want the widget to appear, and select Continue.
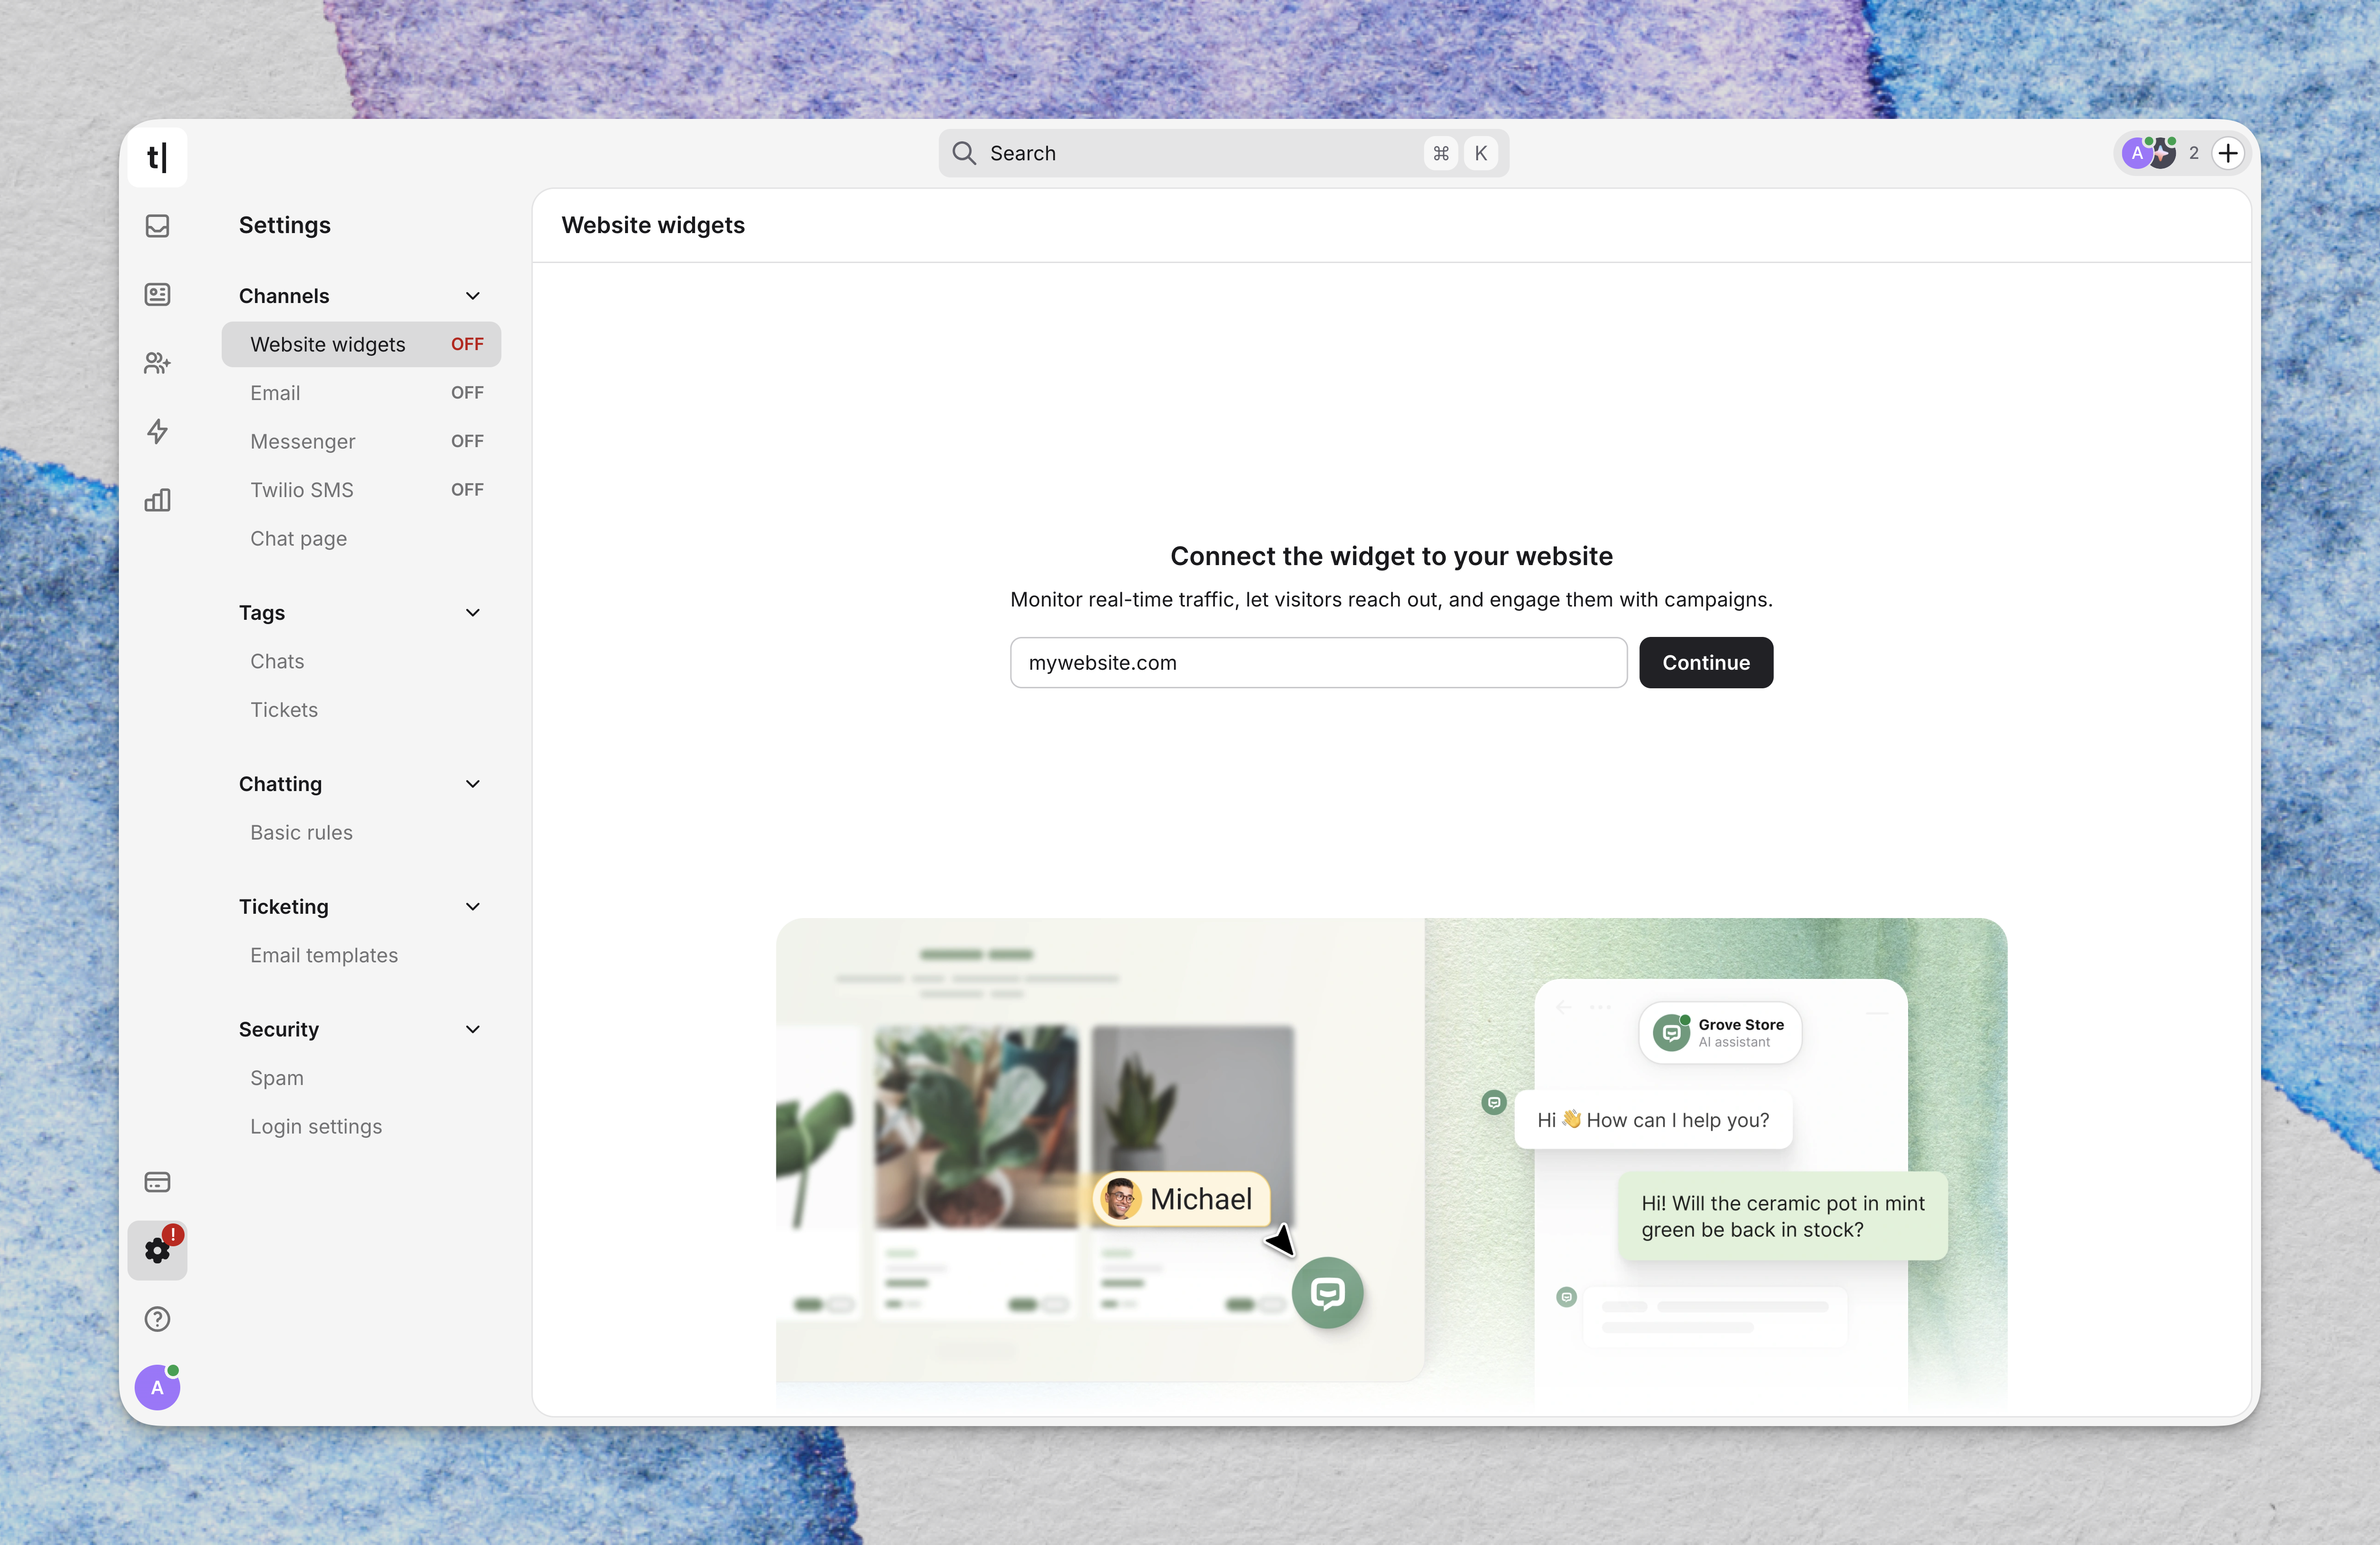
Step 3: Select Embed code
Choose Embed code, and then select Continue. This installation path includes the framework SDKs and the standard HTML snippet.
Step 4: Select your framework
Choose React, Vue, or Angular. Text displays the package command and code required for the selected framework in the same installation view.

Step 5: Install the widget package
Run the package installation command displayed in Text from your application directory. Use the package and command shown for the framework you selected.
Step 6: Import the component or module
- For React or Vue, import TextWidget.
- For Angular, import LiveChatWidgetModule.
Step 7: Add the widget to your interface
- React: add TextWidget to the appropriate component.
- Vue: add TextWidget to the appropriate template.
- Angular: add text-widget to the appropriate template.
Use the organization or license identifier shown in the generated Text instructions. For additional SDK options, select Read guide in the framework tab.
Install the widget manually using HTML
Step 1: Open website widget settings
Go to Settings → Channels → Website widgets, select + New website widget, and enter the website URL.
Step 2: Select Embed code
Choose Embed code, select Continue, and open the HTML tab.
Step 3: Copy the installation code
Text generates a unique JavaScript snippet for your website. Select Copy code to copy the complete snippet.
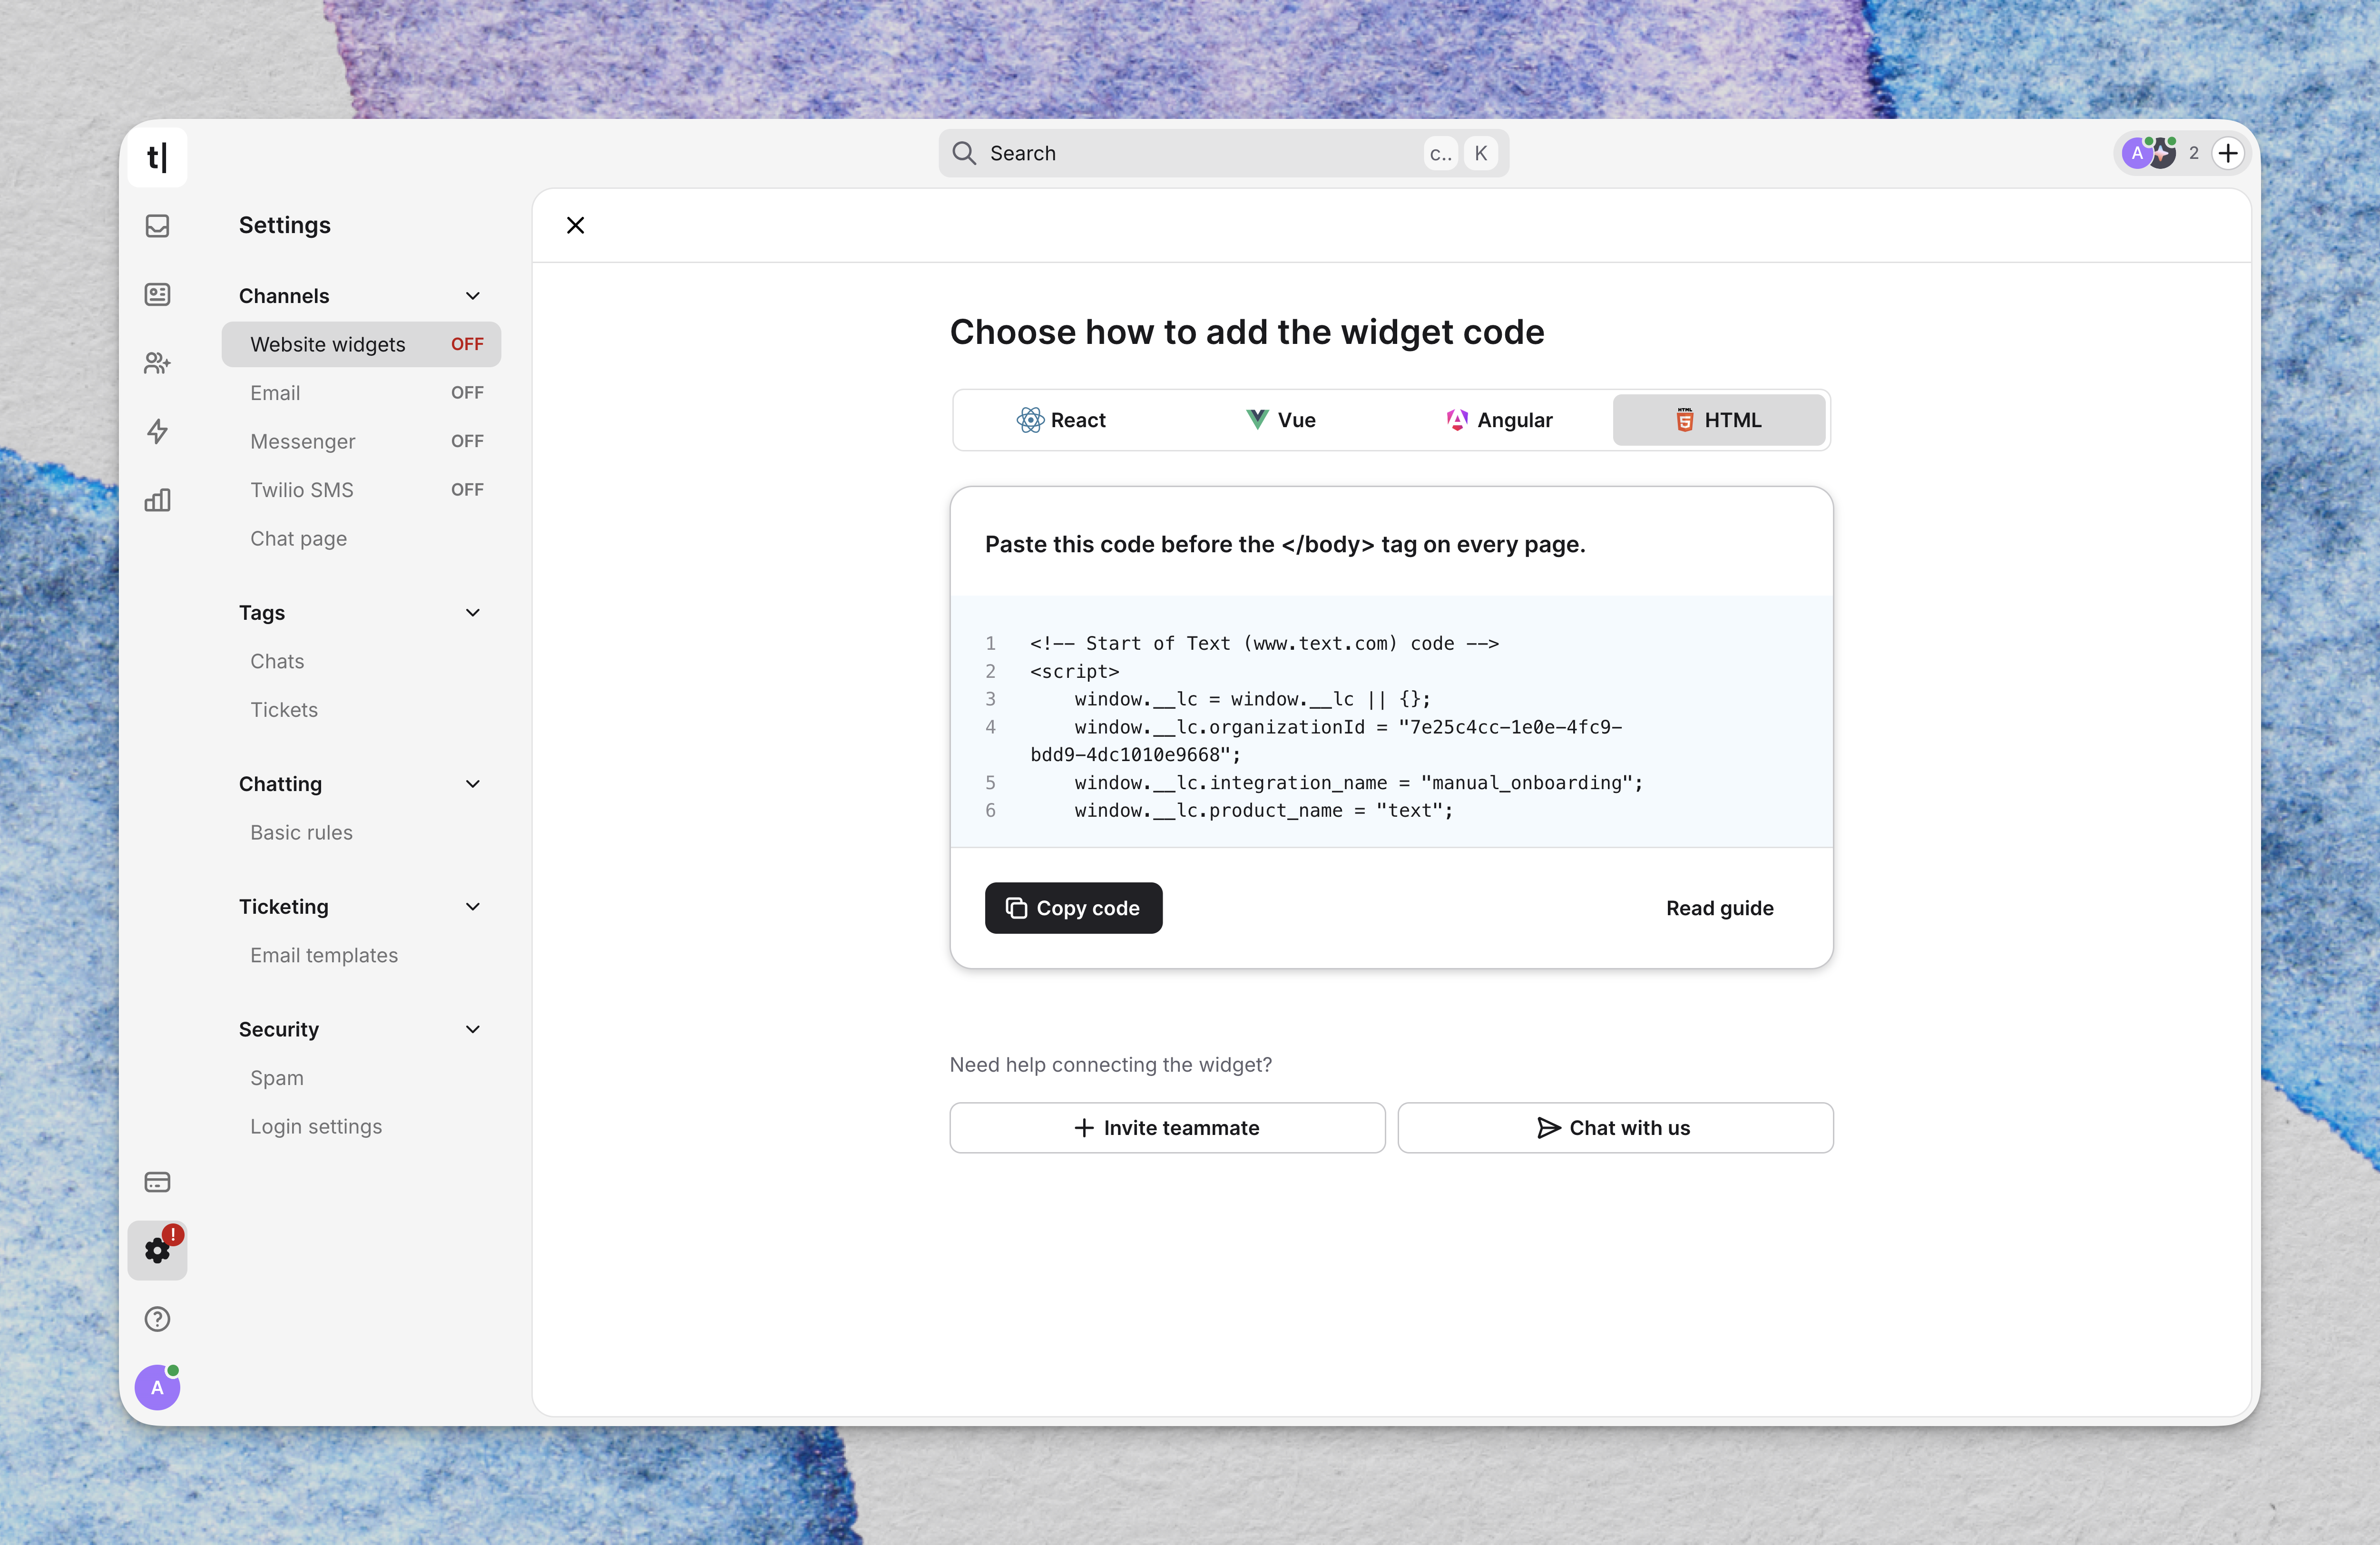
Step 4: Add the code to your website
Paste the snippet immediately before the closing </body> tag, save the file, and publish or deploy the website change. If your site uses a CMS, theme, or shared layout, add the snippet to the global footer or layout so it loads on every intended page.
To show the widget on only one page, add the snippet only to that page or its page-specific template.
Install the widget using Google Tag Manager
Step 1: Select Google Tag Manager
In Settings → Channels → Website widgets, enter the website URL and choose Google Tag Manager as the installation method. Select Connect.
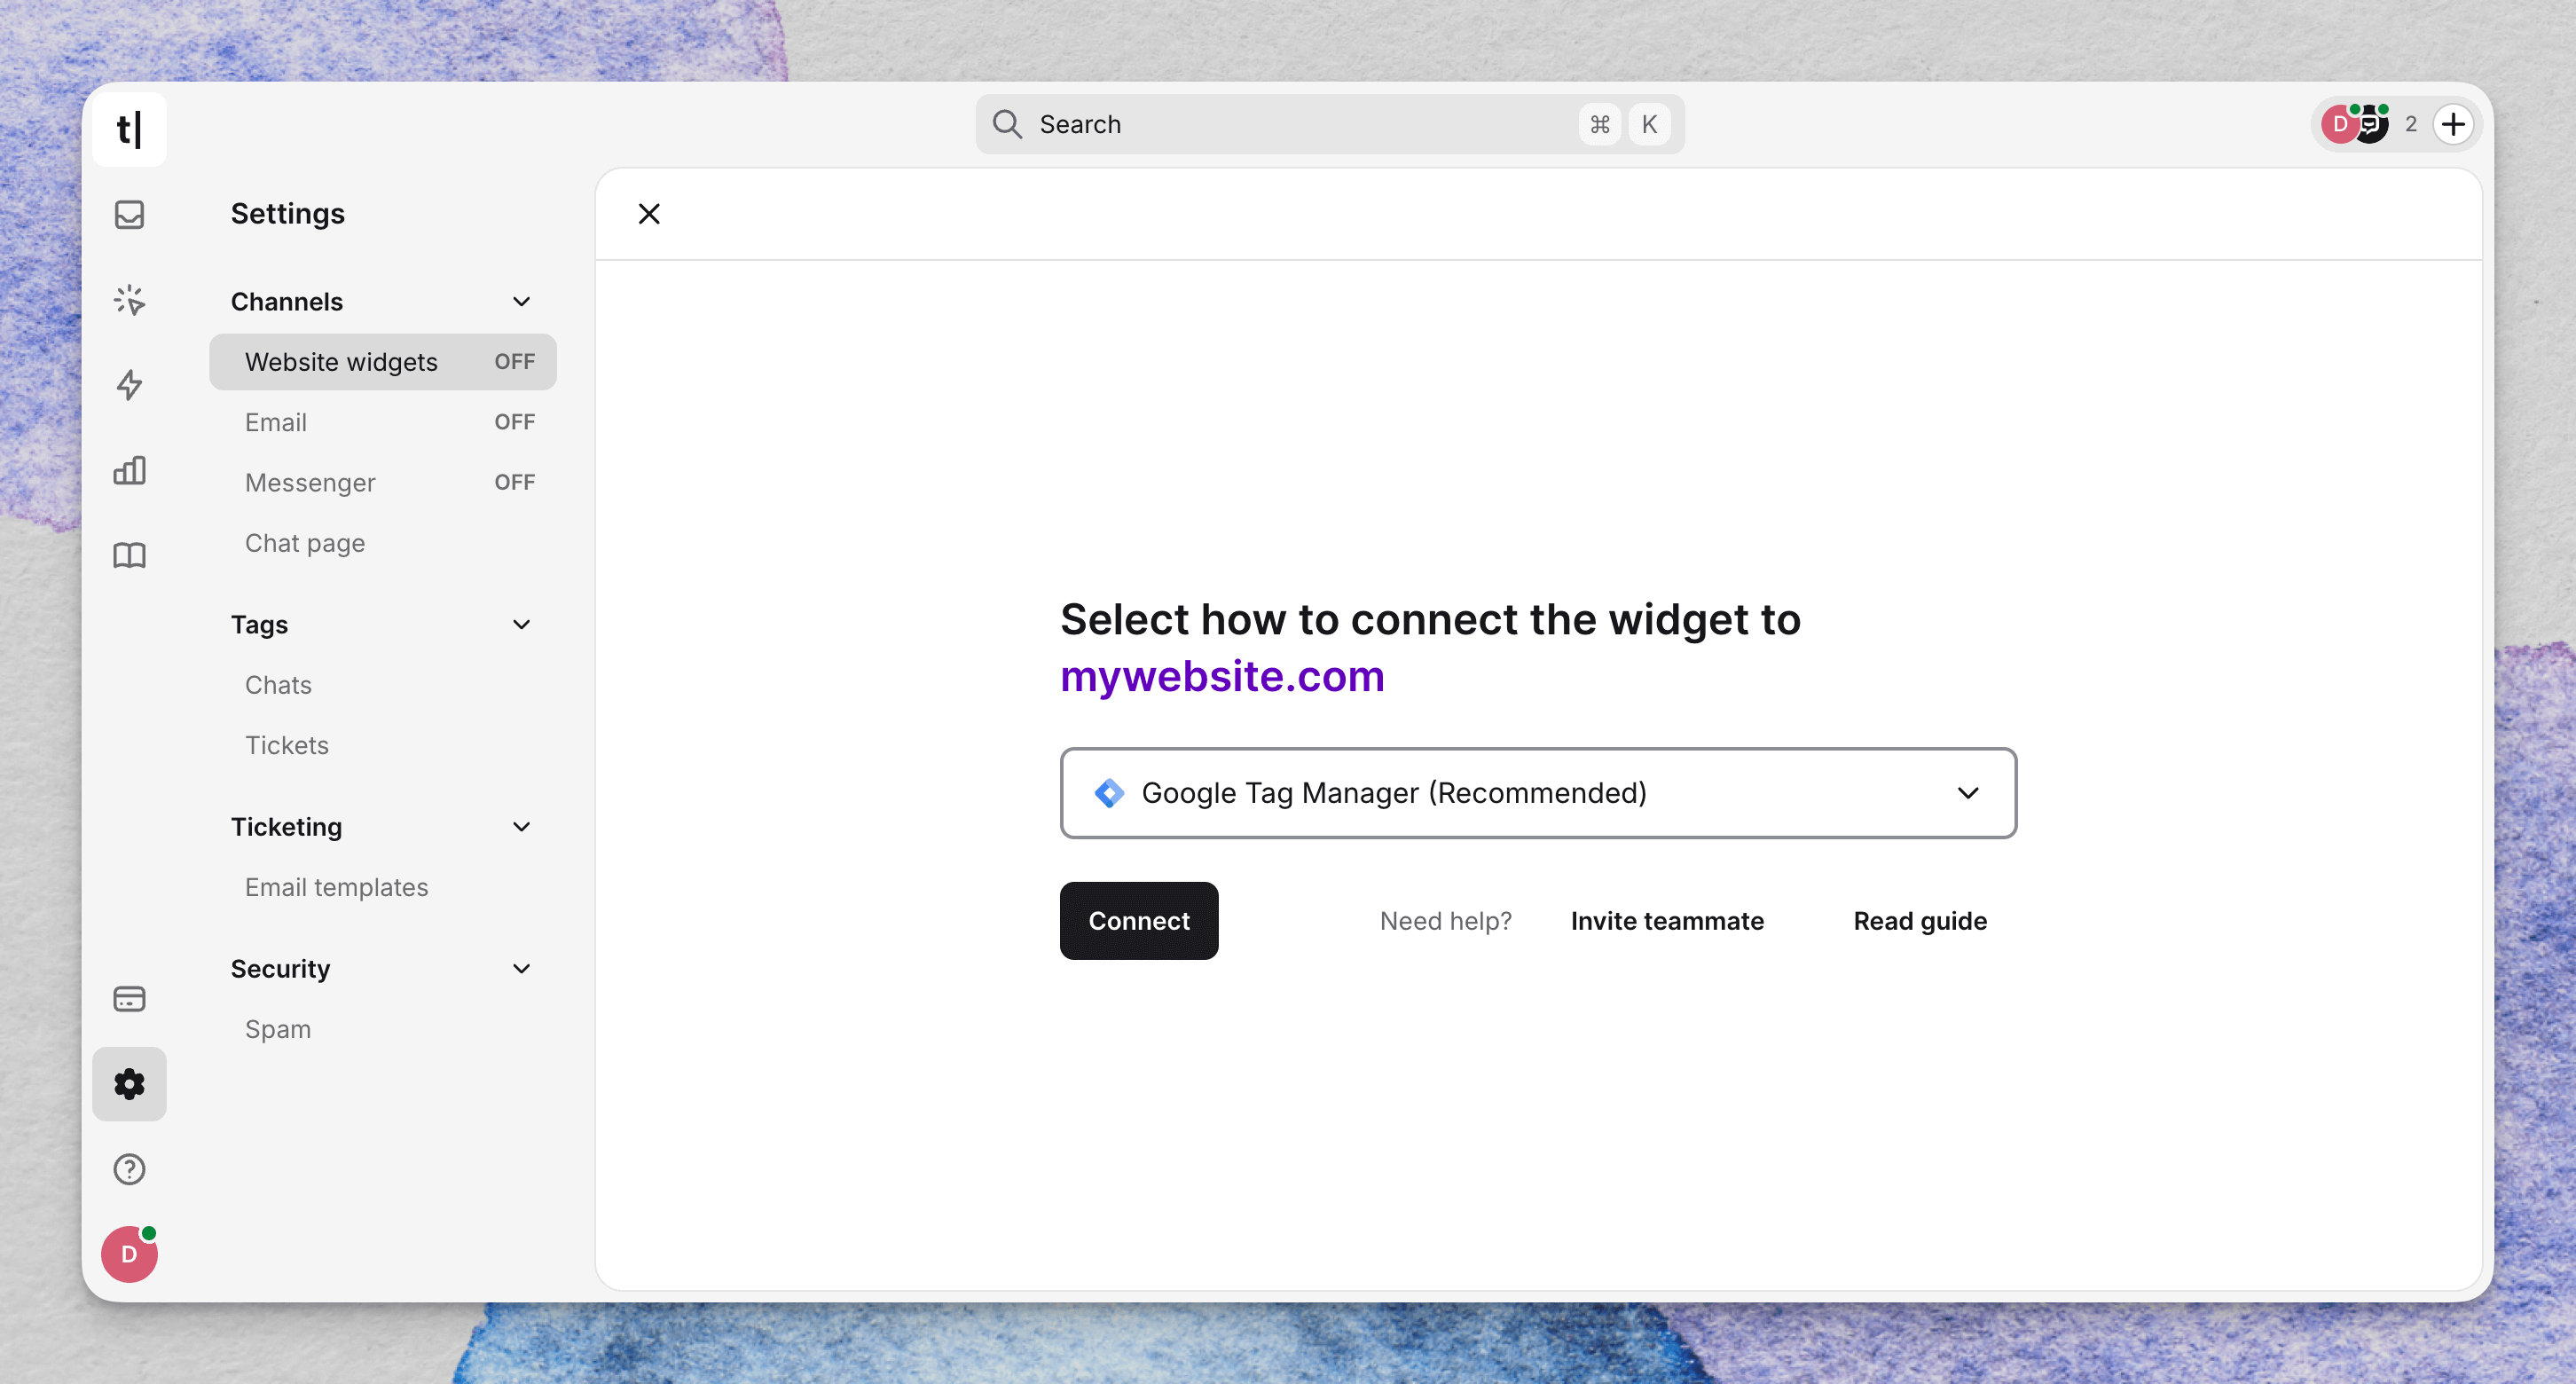
Step 2: Connect the Google account and container
Choose a Google account that can create and publish GTM tags. Then select the GTM account connected to your website and the container where Text should add the widget tag.
Step 3: Preview and publish the tag
Preview the widget from GTM. When it looks and behaves as expected, select Publish to make the Text widget tag live.
See Connecting the website widget using GTM for the complete account, container, permission, and troubleshooting instructions.
Use a platform-specific installation
If your website runs on a supported platform, follow its dedicated setup guide instead of manually adding the HTML snippet:
- Add the Text website widget to WordPress
- Connect the website widget using Shopify
- Connect Webflow to Text
Verify the installation and test AI Agent
Step 1: Check the widget status
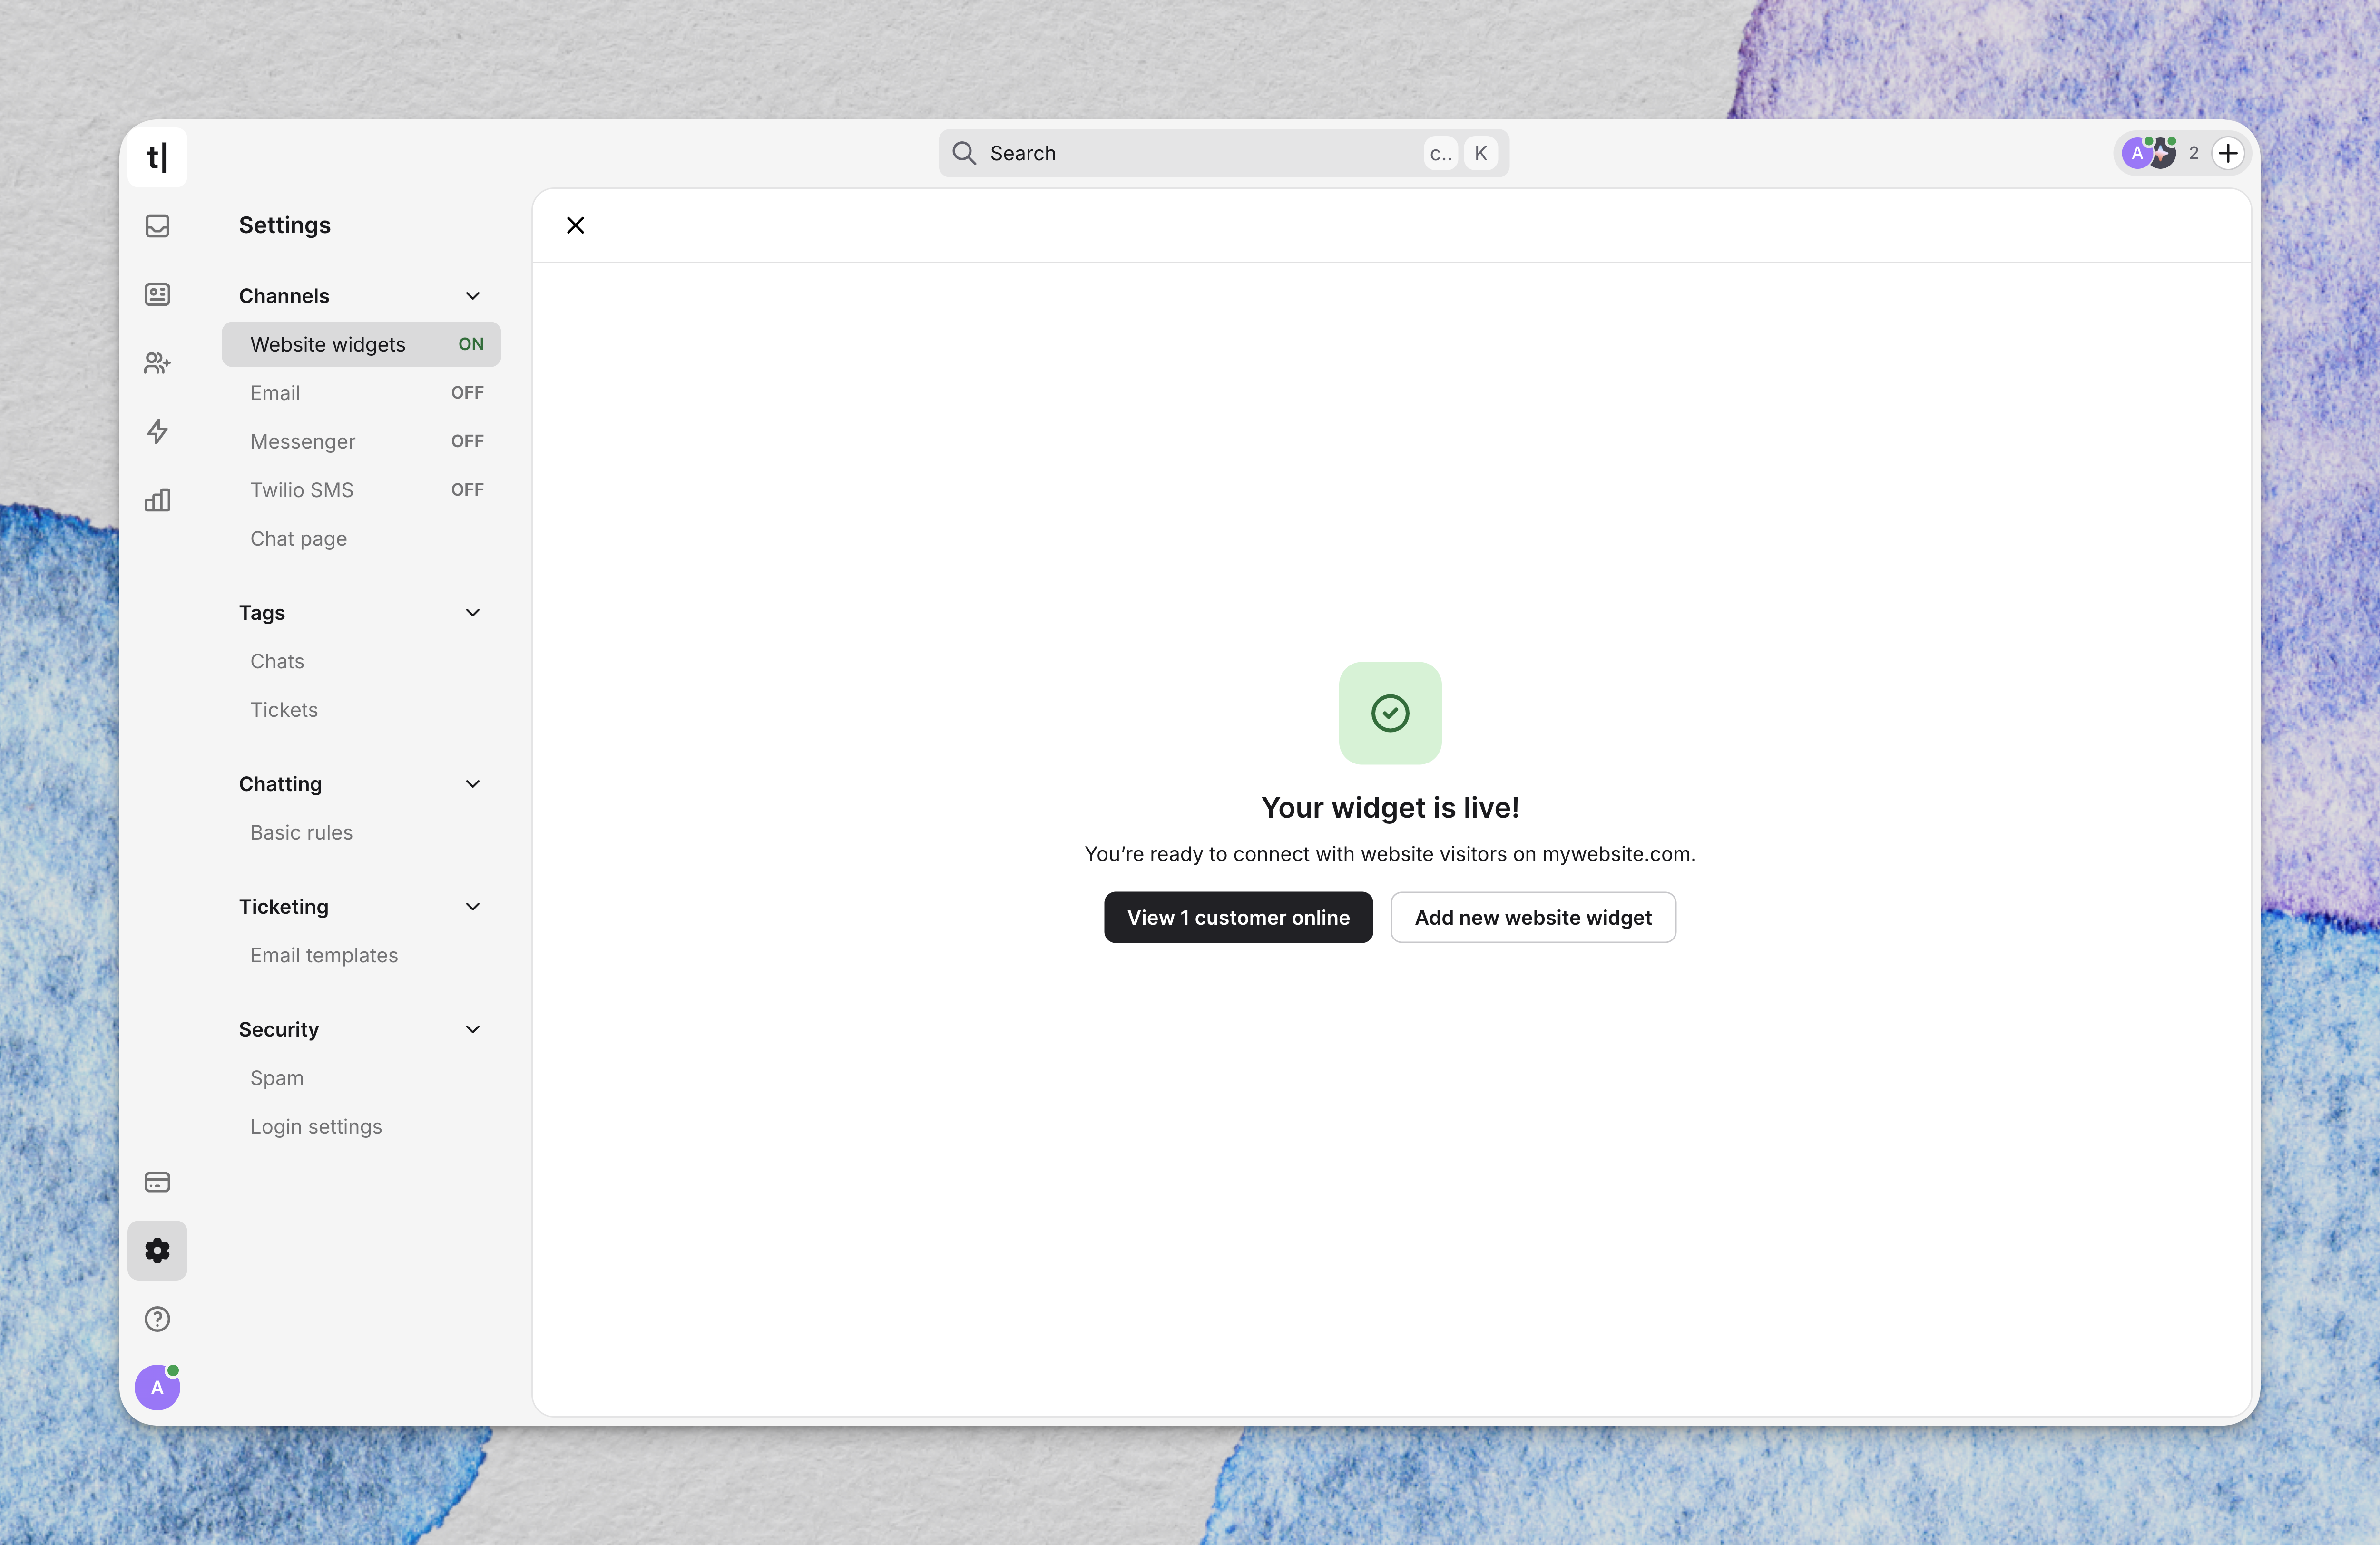
Visit the website after completing the selected installation path. If needed, open the widget and send a message so Text can detect activity. A successful installation changes the status to Connected and confirms that the widget is live.
Step 2: Test the customer experience
Open the website in a private browsing window and start a conversation. Confirm that:
- The widget loads on the intended desktop and mobile pages.
- AI Agent answers using the expected knowledge and instructions.
- Enabled Skills collect details, create tickets, or take other configured actions as expected.
- A request for a person transfers to the intended teammate or team.
Manage and customize the website widget
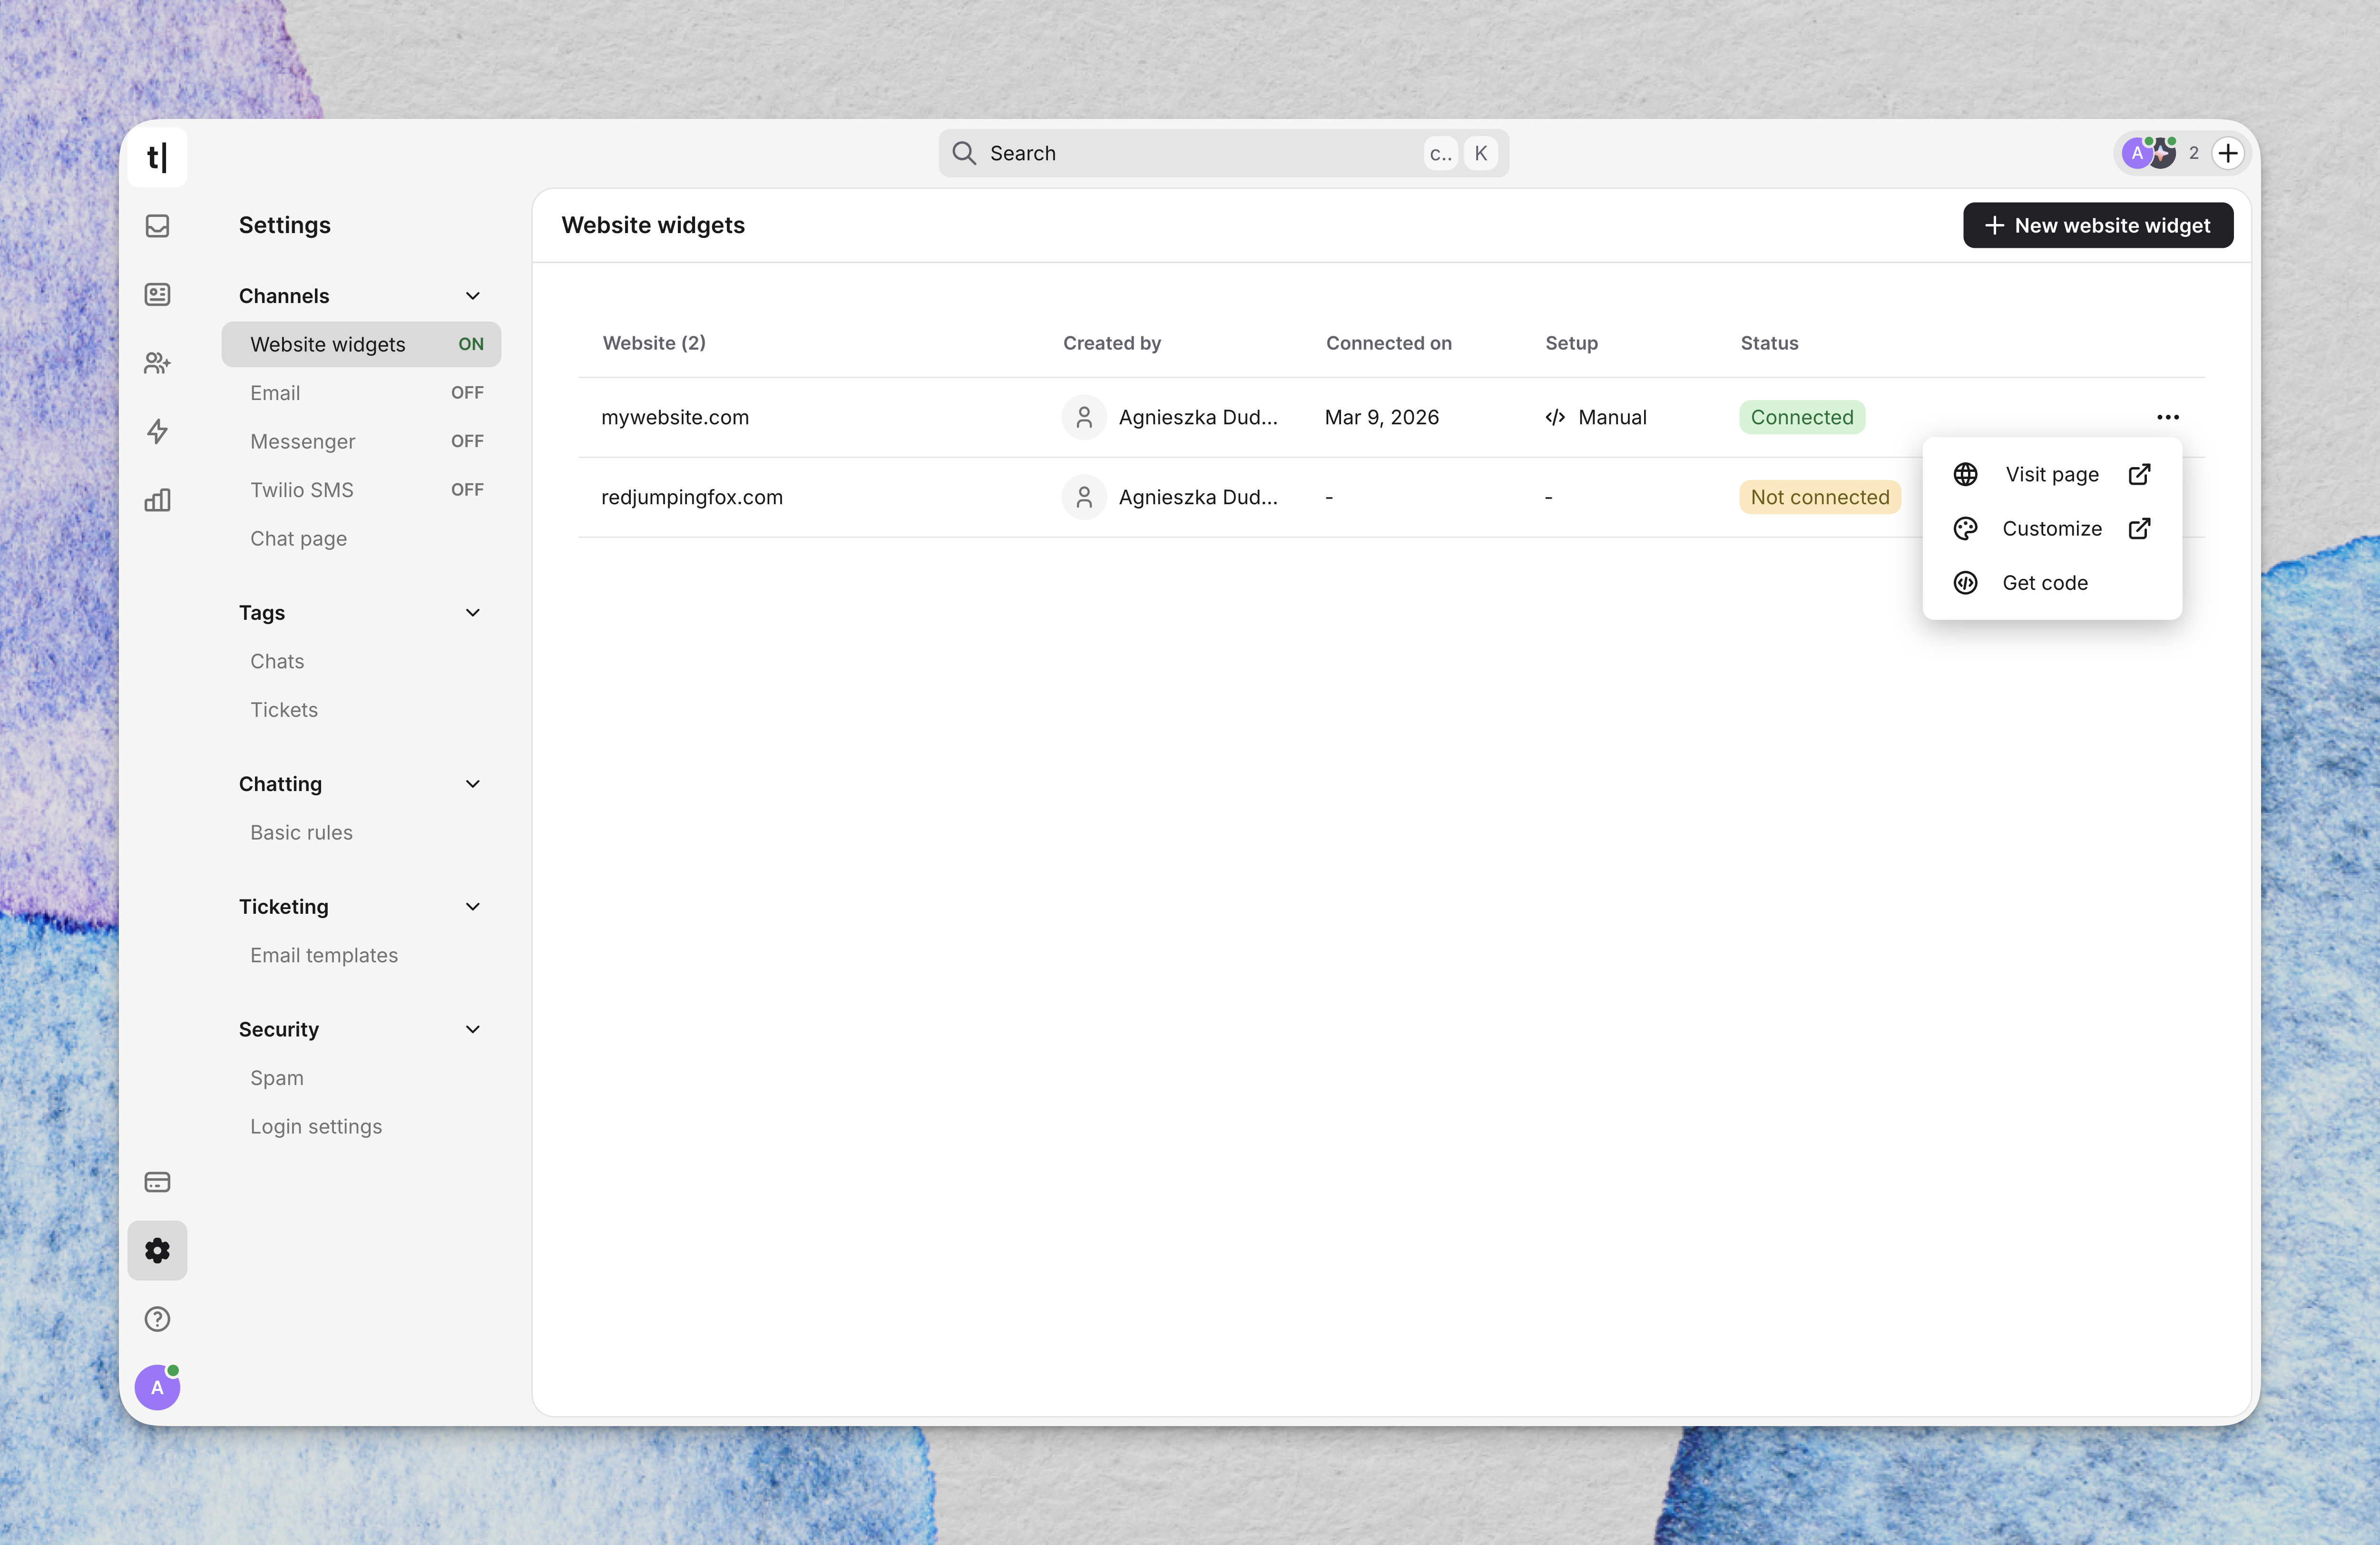
Return to Settings → Channels → Website widgets to manage every connected website. The list shows the website URL, creator, connection date, setup method, and status.
Open the three-dot menu beside a website to visit the page, customize the widget, or retrieve its installation code. Select + New website widget to connect another website.
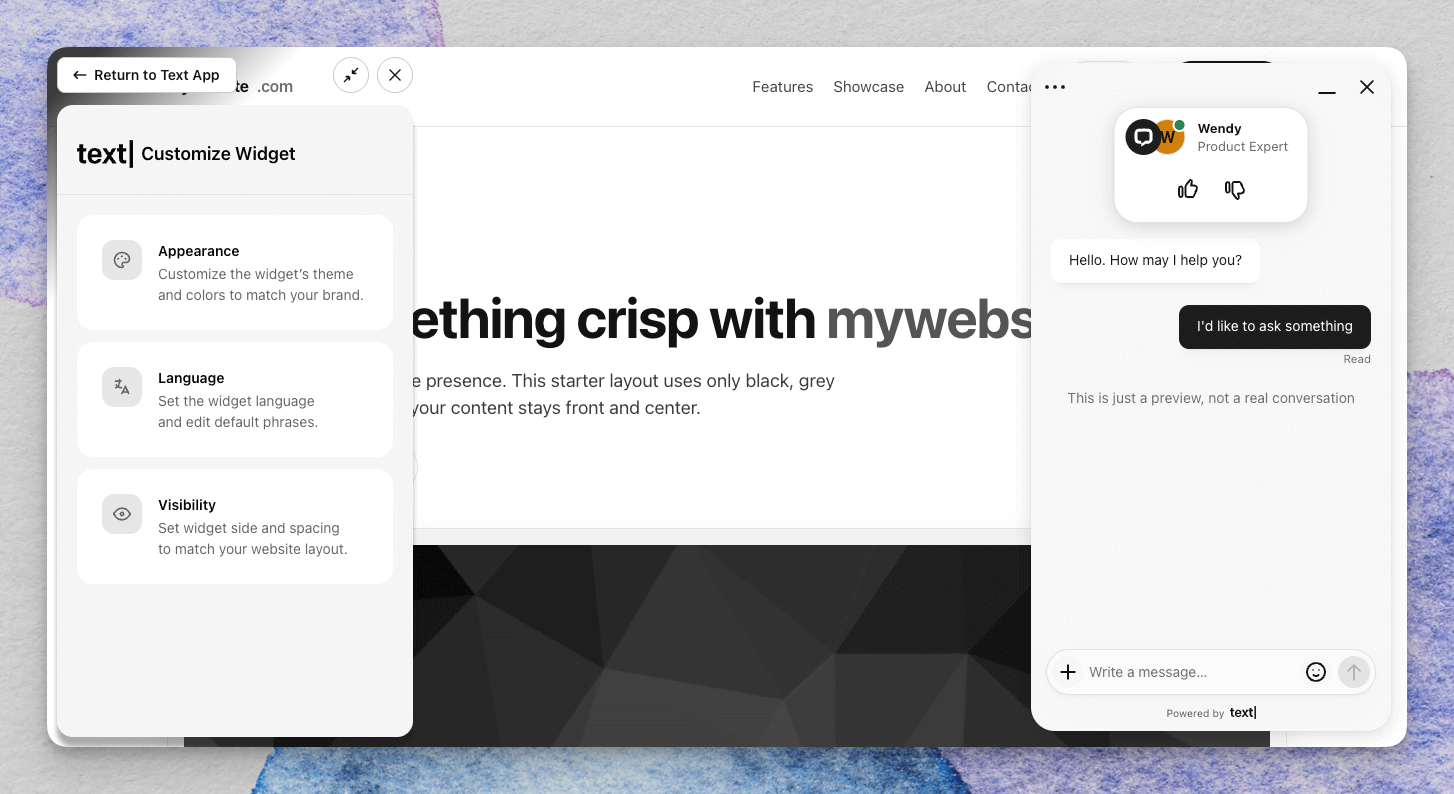
Select Customize to open the on-site configurator. Use Appearance to adjust the theme and colors, Language to select the widget language and edit default phrases, and Visibility to control its side, spacing, and mobile display. Select Save changes when the widget is ready.
For full setup details, see Adding the widget to your website and Customizing your website widget.
How to build a chatbot with the previous ChatBot.com workflow
The previous ChatBot.com Visual Builder and AI Assist workflow remains available for existing users. The instructions below apply specifically to a ChatBot.com chatbot and its Chat Widget; they do not describe AI Agent settings in Text.
With Chat Widget, you can easily install the chatbot widget on your website, adjust the appearance of your chat window to match your website design, and set greetings to ensure a consistent brand experience.

This article concerns our ChatBot Chat Widget, released on September 30, 2024.
If you already have a bot installed with Chat Widget (legacy) and want to switch to a new chat window version, remove the old code and paste the new code available in the Publish section after adjusting the new Chat Widget.
This article concerns our ChatBot Chat Widget, released on September 30, 2024.
If you already have a bot installed with Chat Widget (legacy) and want to switch to a new chat window version, remove the old code and paste the new code available in the Publish section after adjusting the new Chat Widget.
You can make all the necessary adjustments in one place to ensure every aspect of the chat window matches your brand. With Chat Widget, you can:
- change the chat window color and the window background.
- adjust the window alignment and set greetings to increase engagement.
- change the bot’s default name and add an avatar.
- add the bot description and links you’d like to display in the chat window.
- enable white label.
- disable the text field to push using buttons during chat.
How to enable Chat Widget integration
Enabling Chat Widget will not automatically install the bot on your site.
Go to the Publish section to install the bot on your site. For more information, watch our video tutorial.
Enabling Chat Widget will not automatically install the bot on your site.
Go to the Publish section to install the bot on your site. For more information, watch our video tutorial.
To start the configuration, go to your bot and enter the Integrations panel. Then, choose Chat Widget from the list by clicking the Connect button.

You will see a page where you can do all the adjustments. On the left side of the screen, you can see all the sections you can edit — General, Appearance, Position, Mobile devices, Greetings, and Publish. Below the menu, you can visit the Preview page.
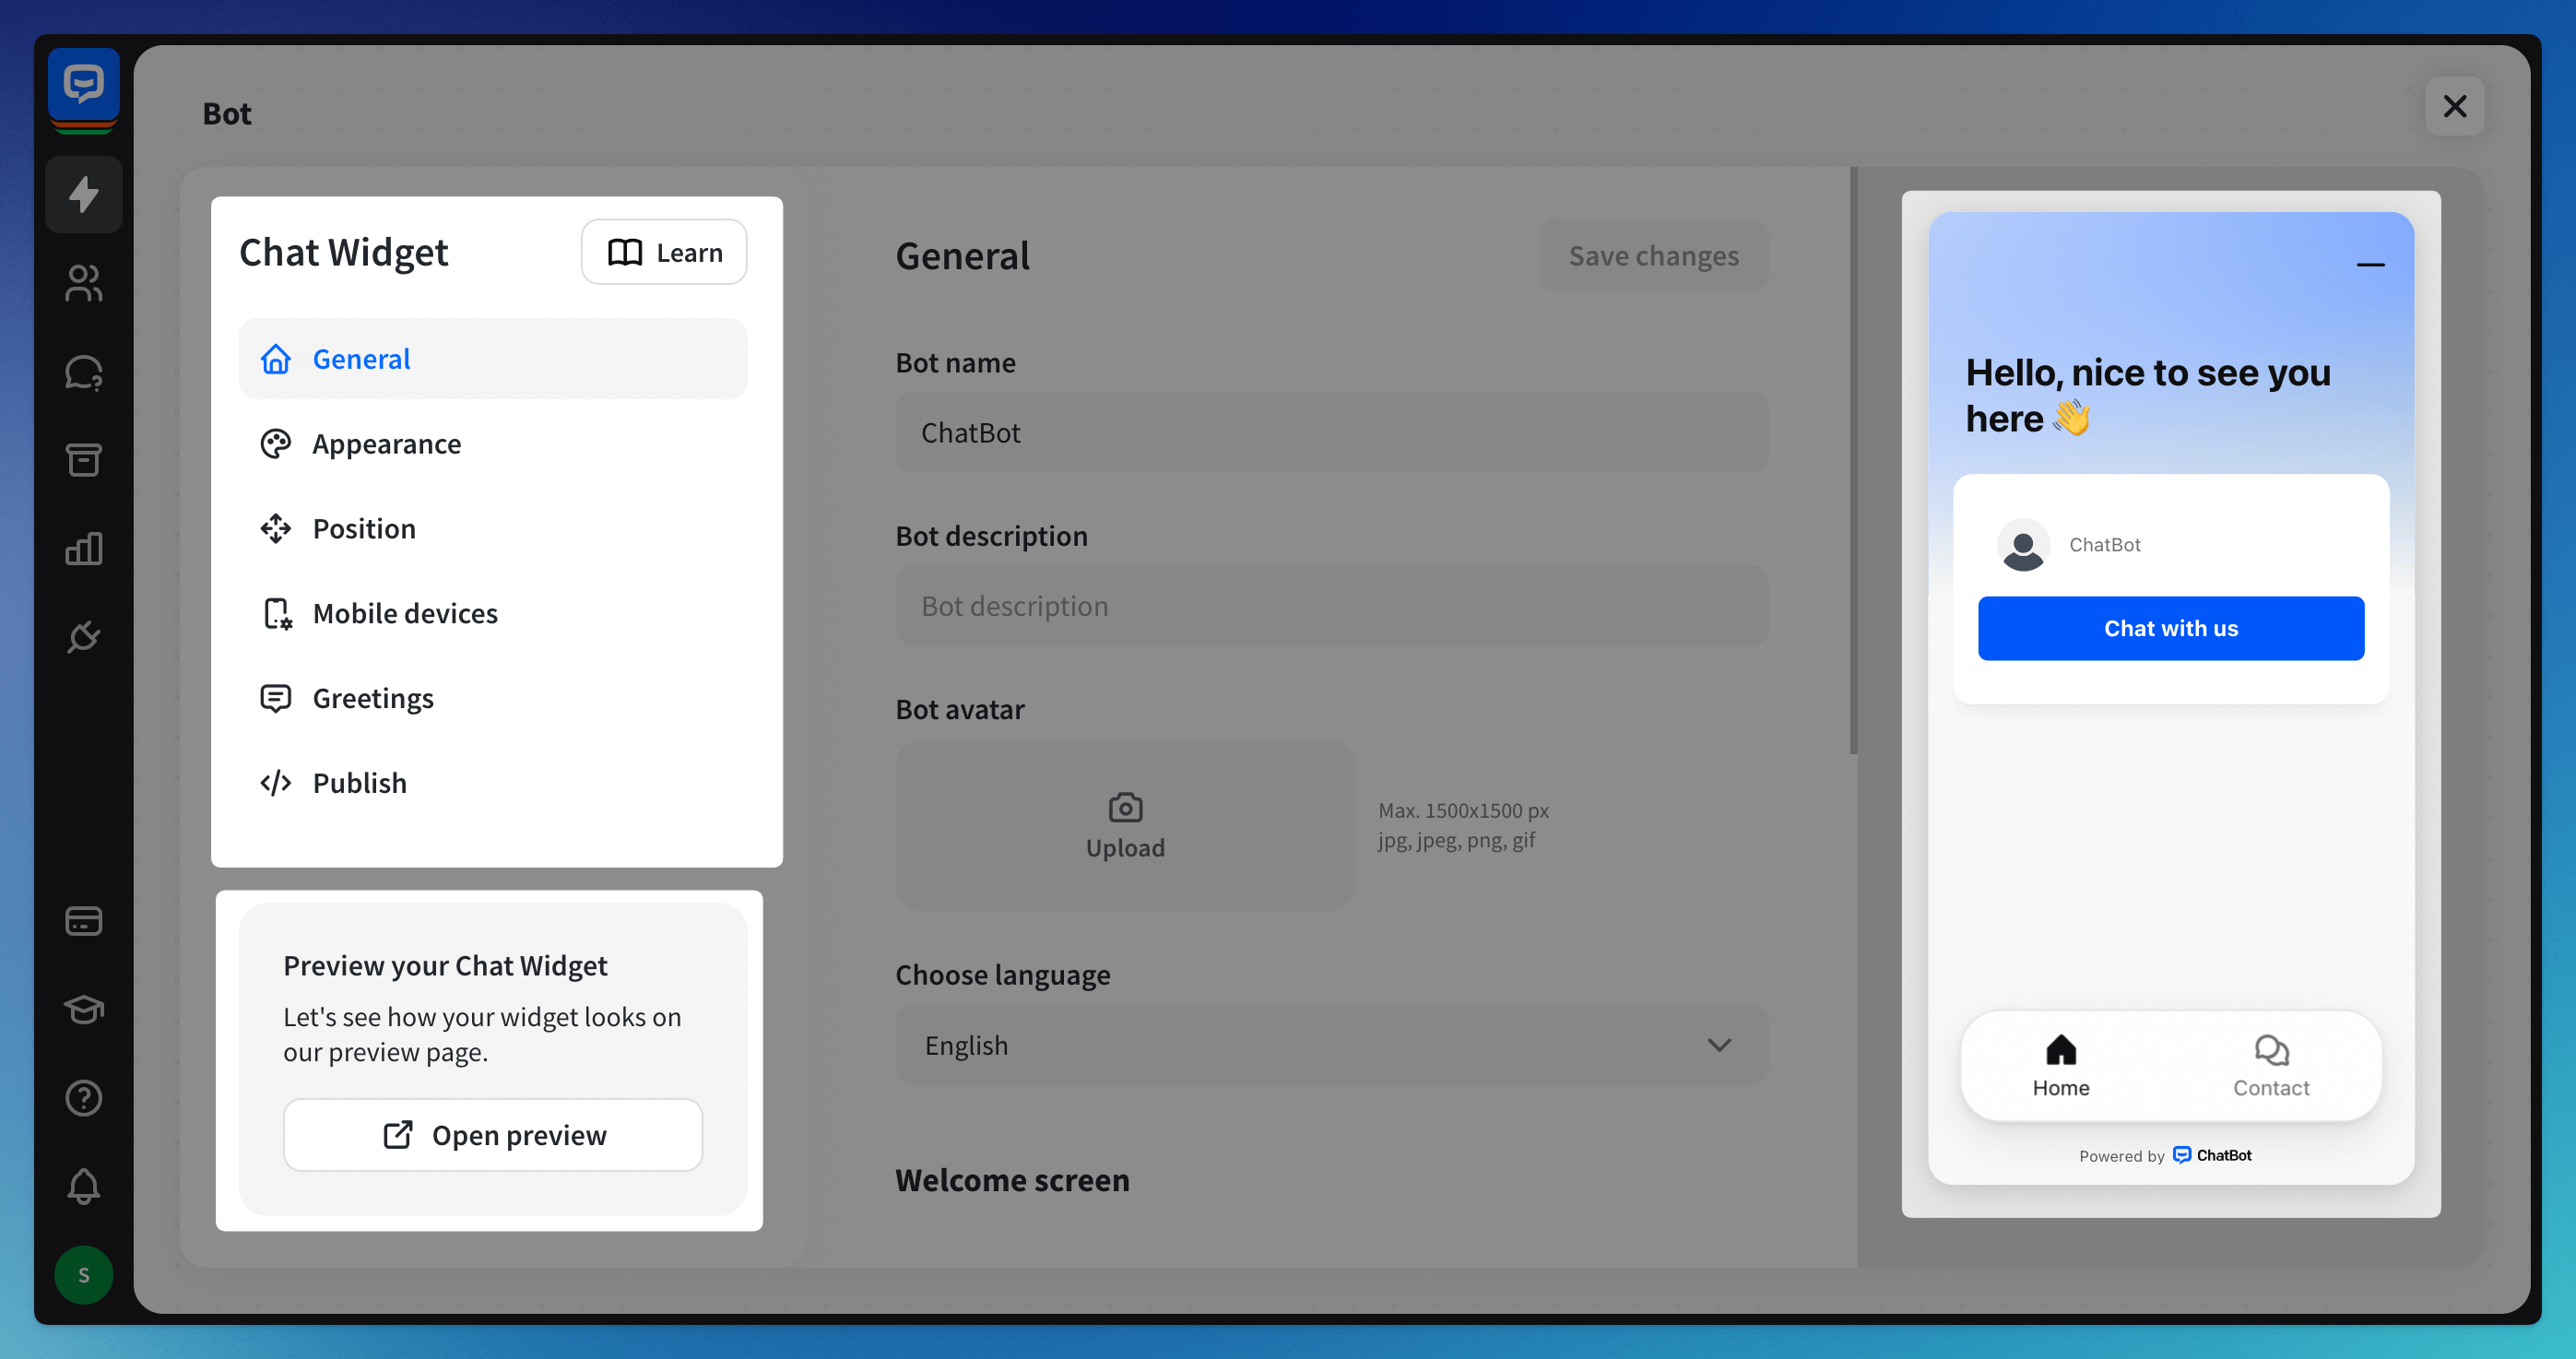
All changes made in the settings will be instantly reflected in the widget on the right side.
General section
In this section, you can change all the bot’s default settings - change its name, add a description that the user will see under the bot’s name, change avatar displayed next to every message the bot sends and choose the chat widget language.
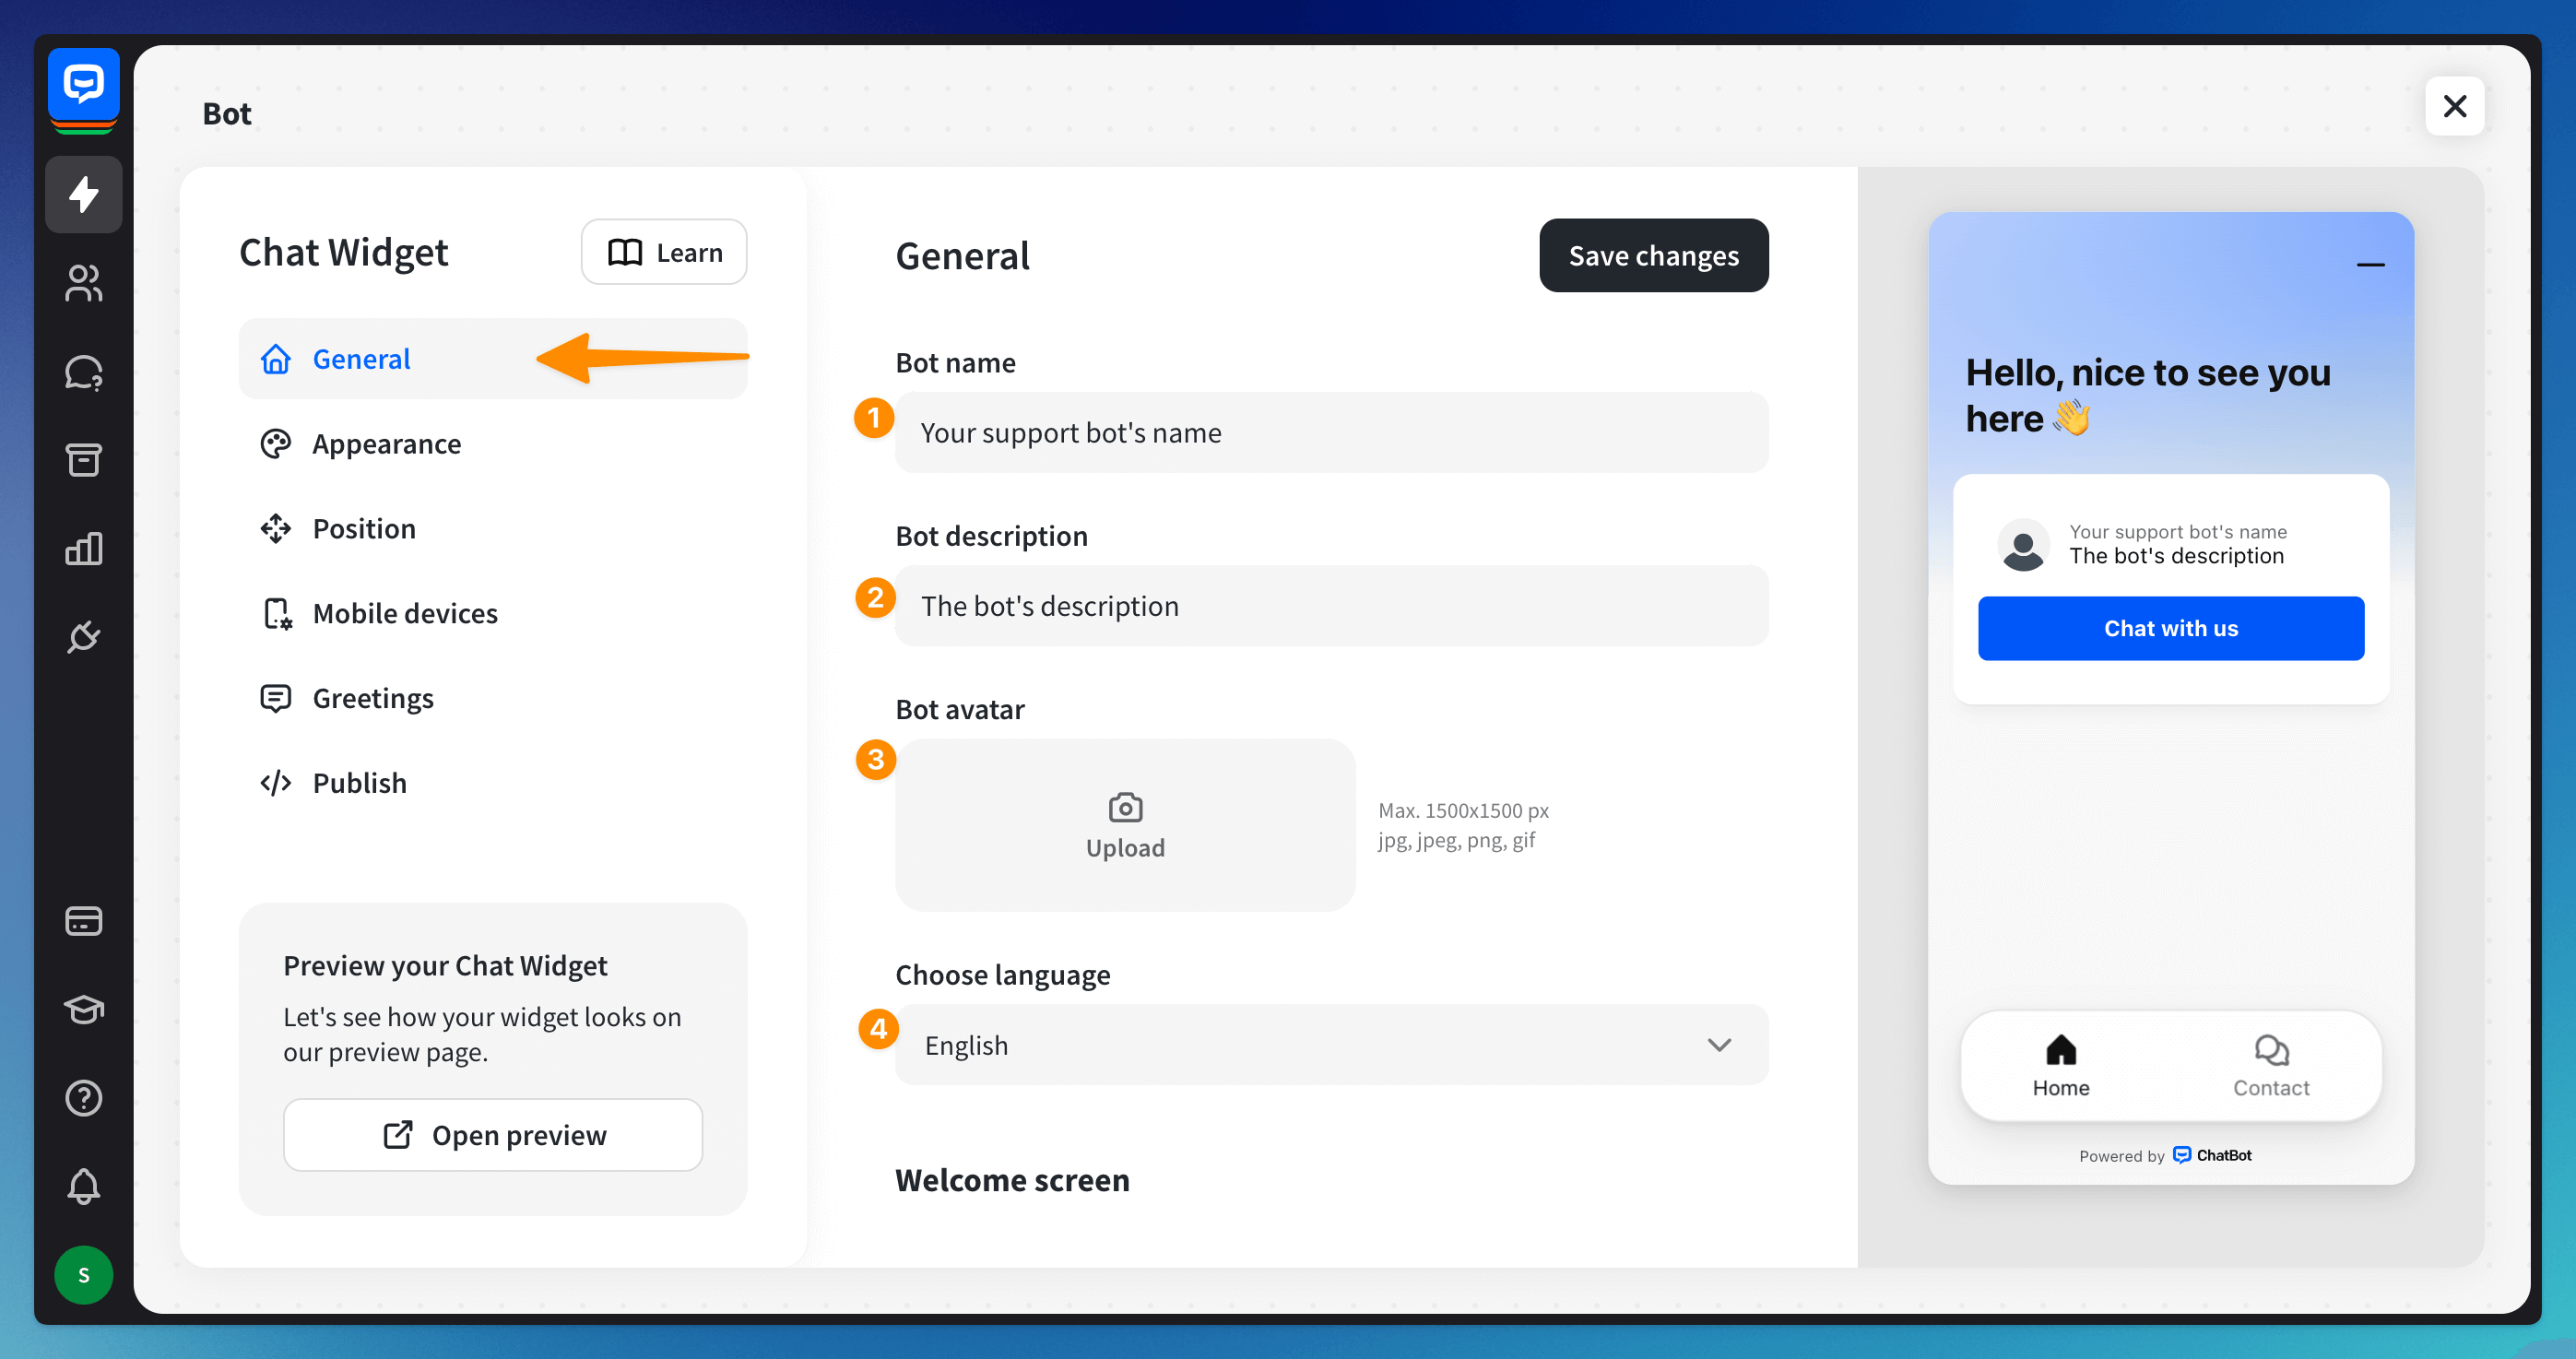
Configure the Welcome screen
The Welcome screen is the first view of the chat window that users see when they click the chat bubble.
Add your logo and welcome text, which the user will see at the top when they open the window. You can also add custom links the user can click directly in the chat window.
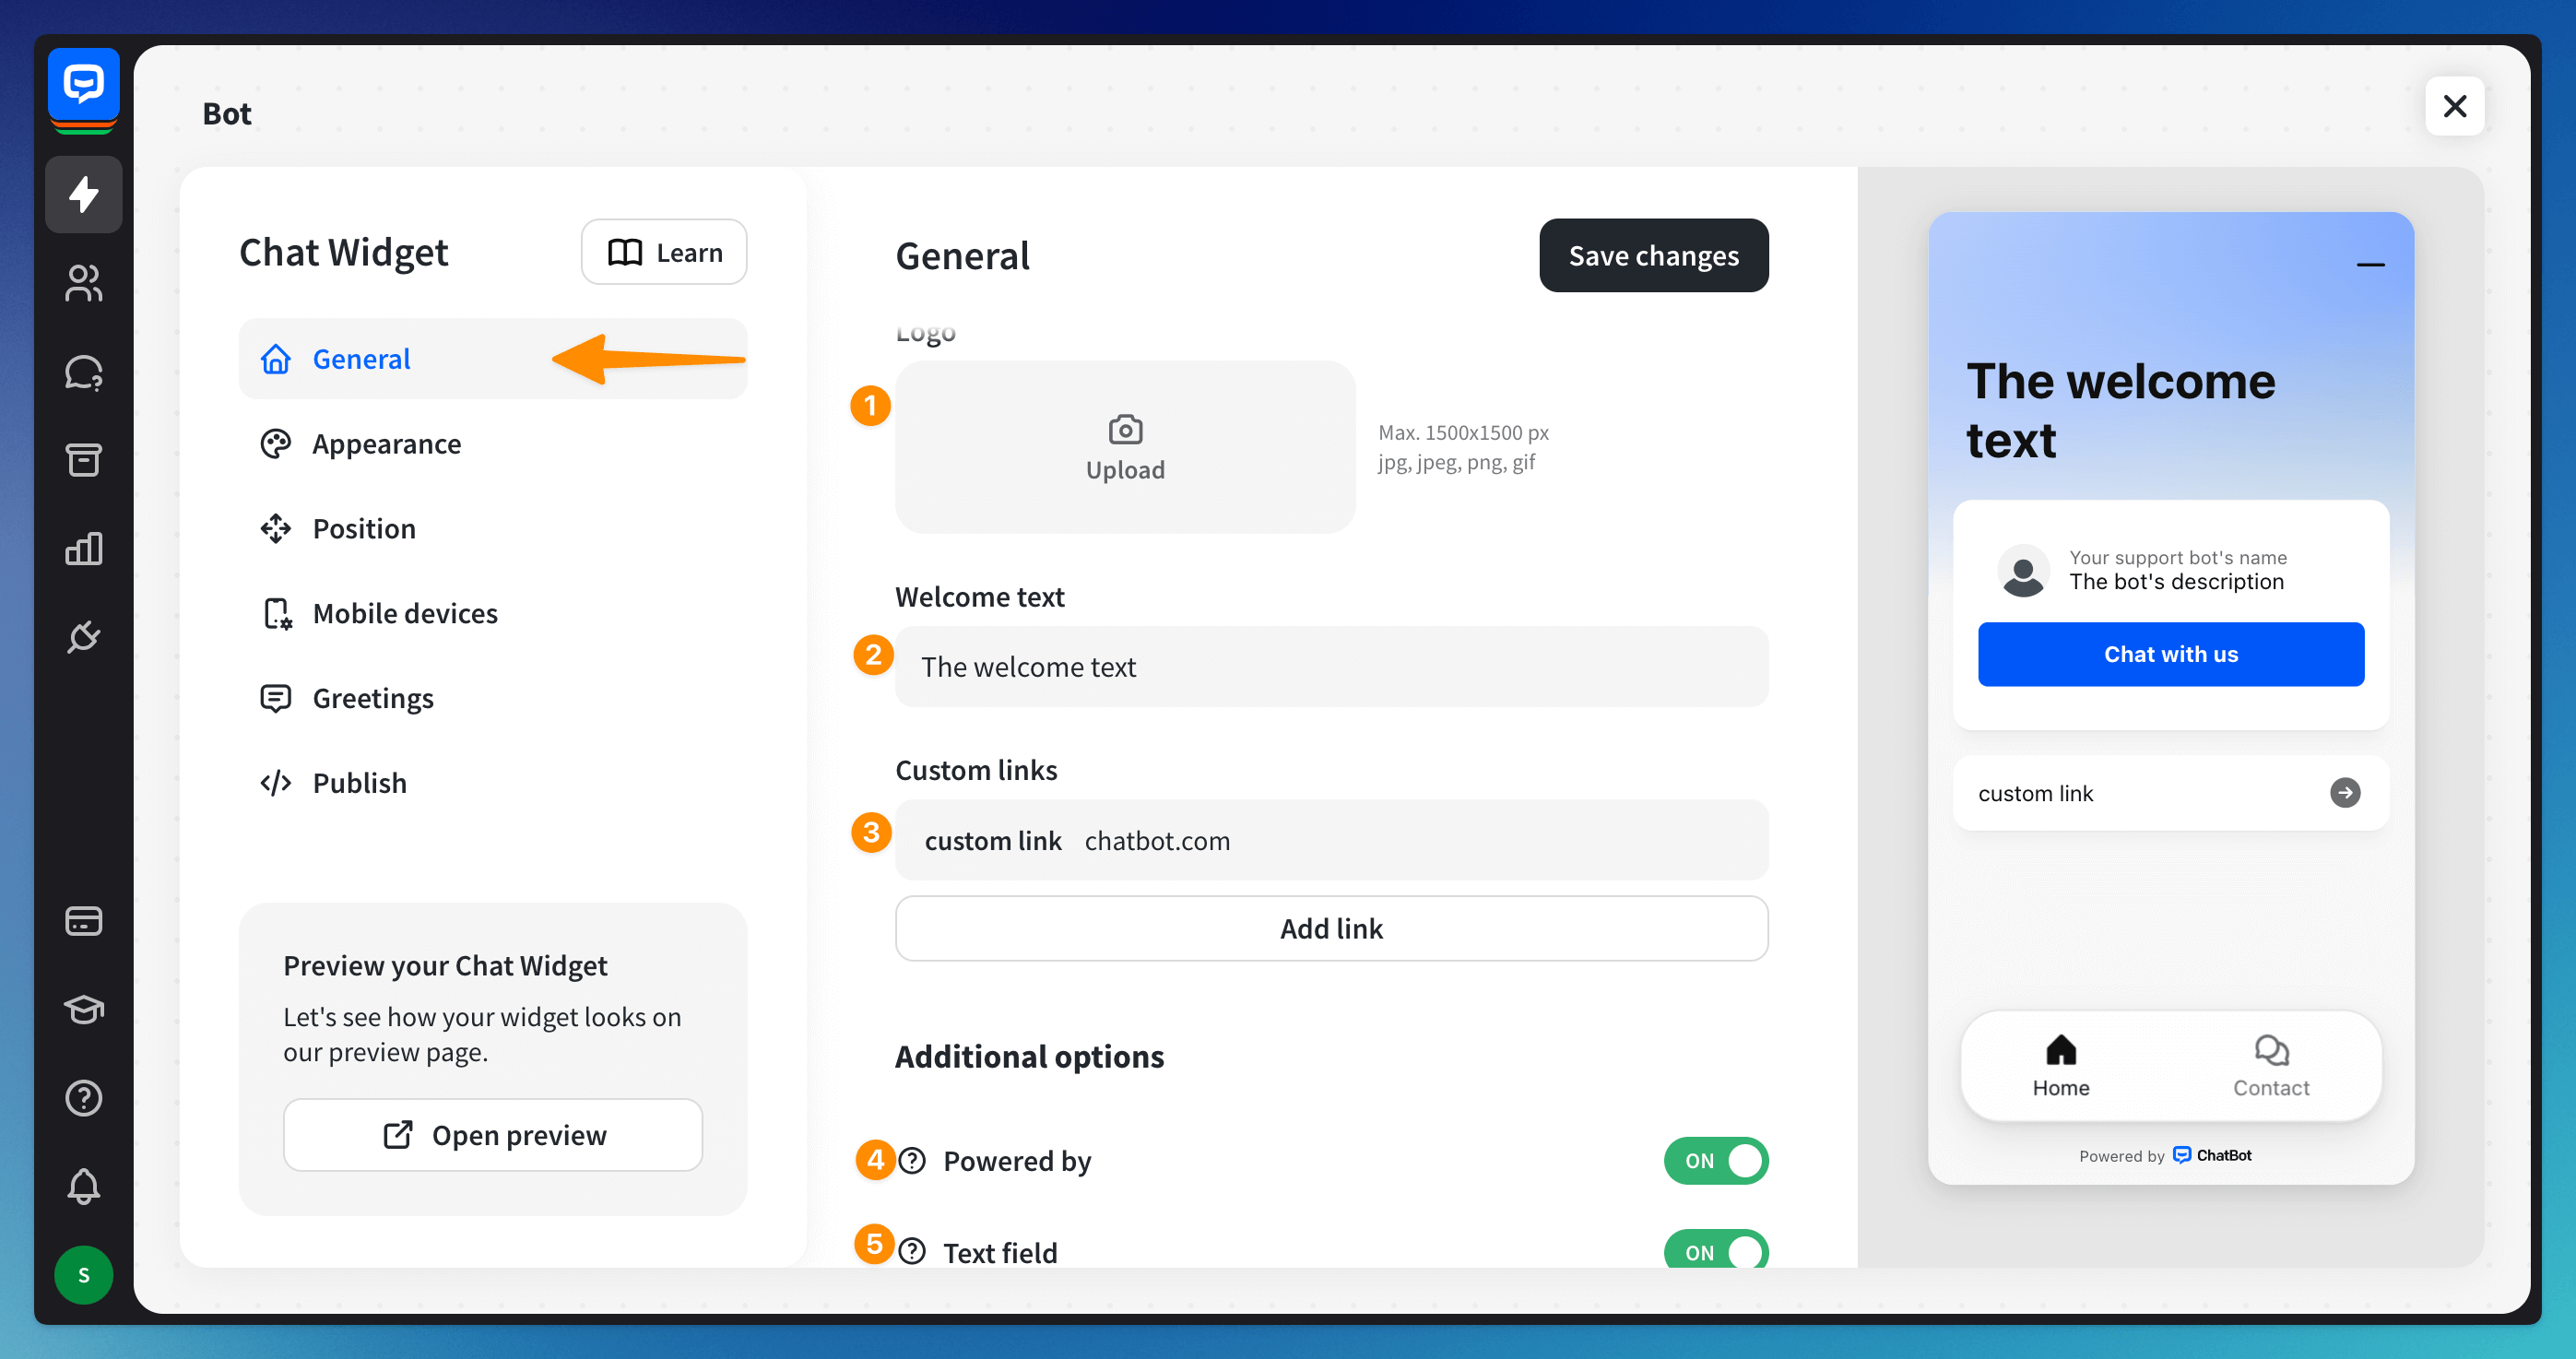
You can also white-label the bot and disable the text field in this section to push your users to use buttons. The text field will be enabled only when the bot uses the Question action during the conversation.
The white label option is available only in Business and Enterprise plans.
When the bot is integrated with LiveChat, all changes should occur in the LiveChat Chat Widget configurator.
If you have the bot integrated with Facebook Messenger or with Slack, you cannot adjust the chat window.
The white label option is available only in Business and Enterprise plans.
When the bot is integrated with LiveChat, all changes should occur in the LiveChat Chat Widget configurator.
If you have the bot integrated with Facebook Messenger or with Slack, you cannot adjust the chat window.
Appearance section
Ensure the chat window matches your brand’s colors and style. Choose the window theme and color. You can choose from the ready-to-use presets or adjust every aspect with the advanced options.
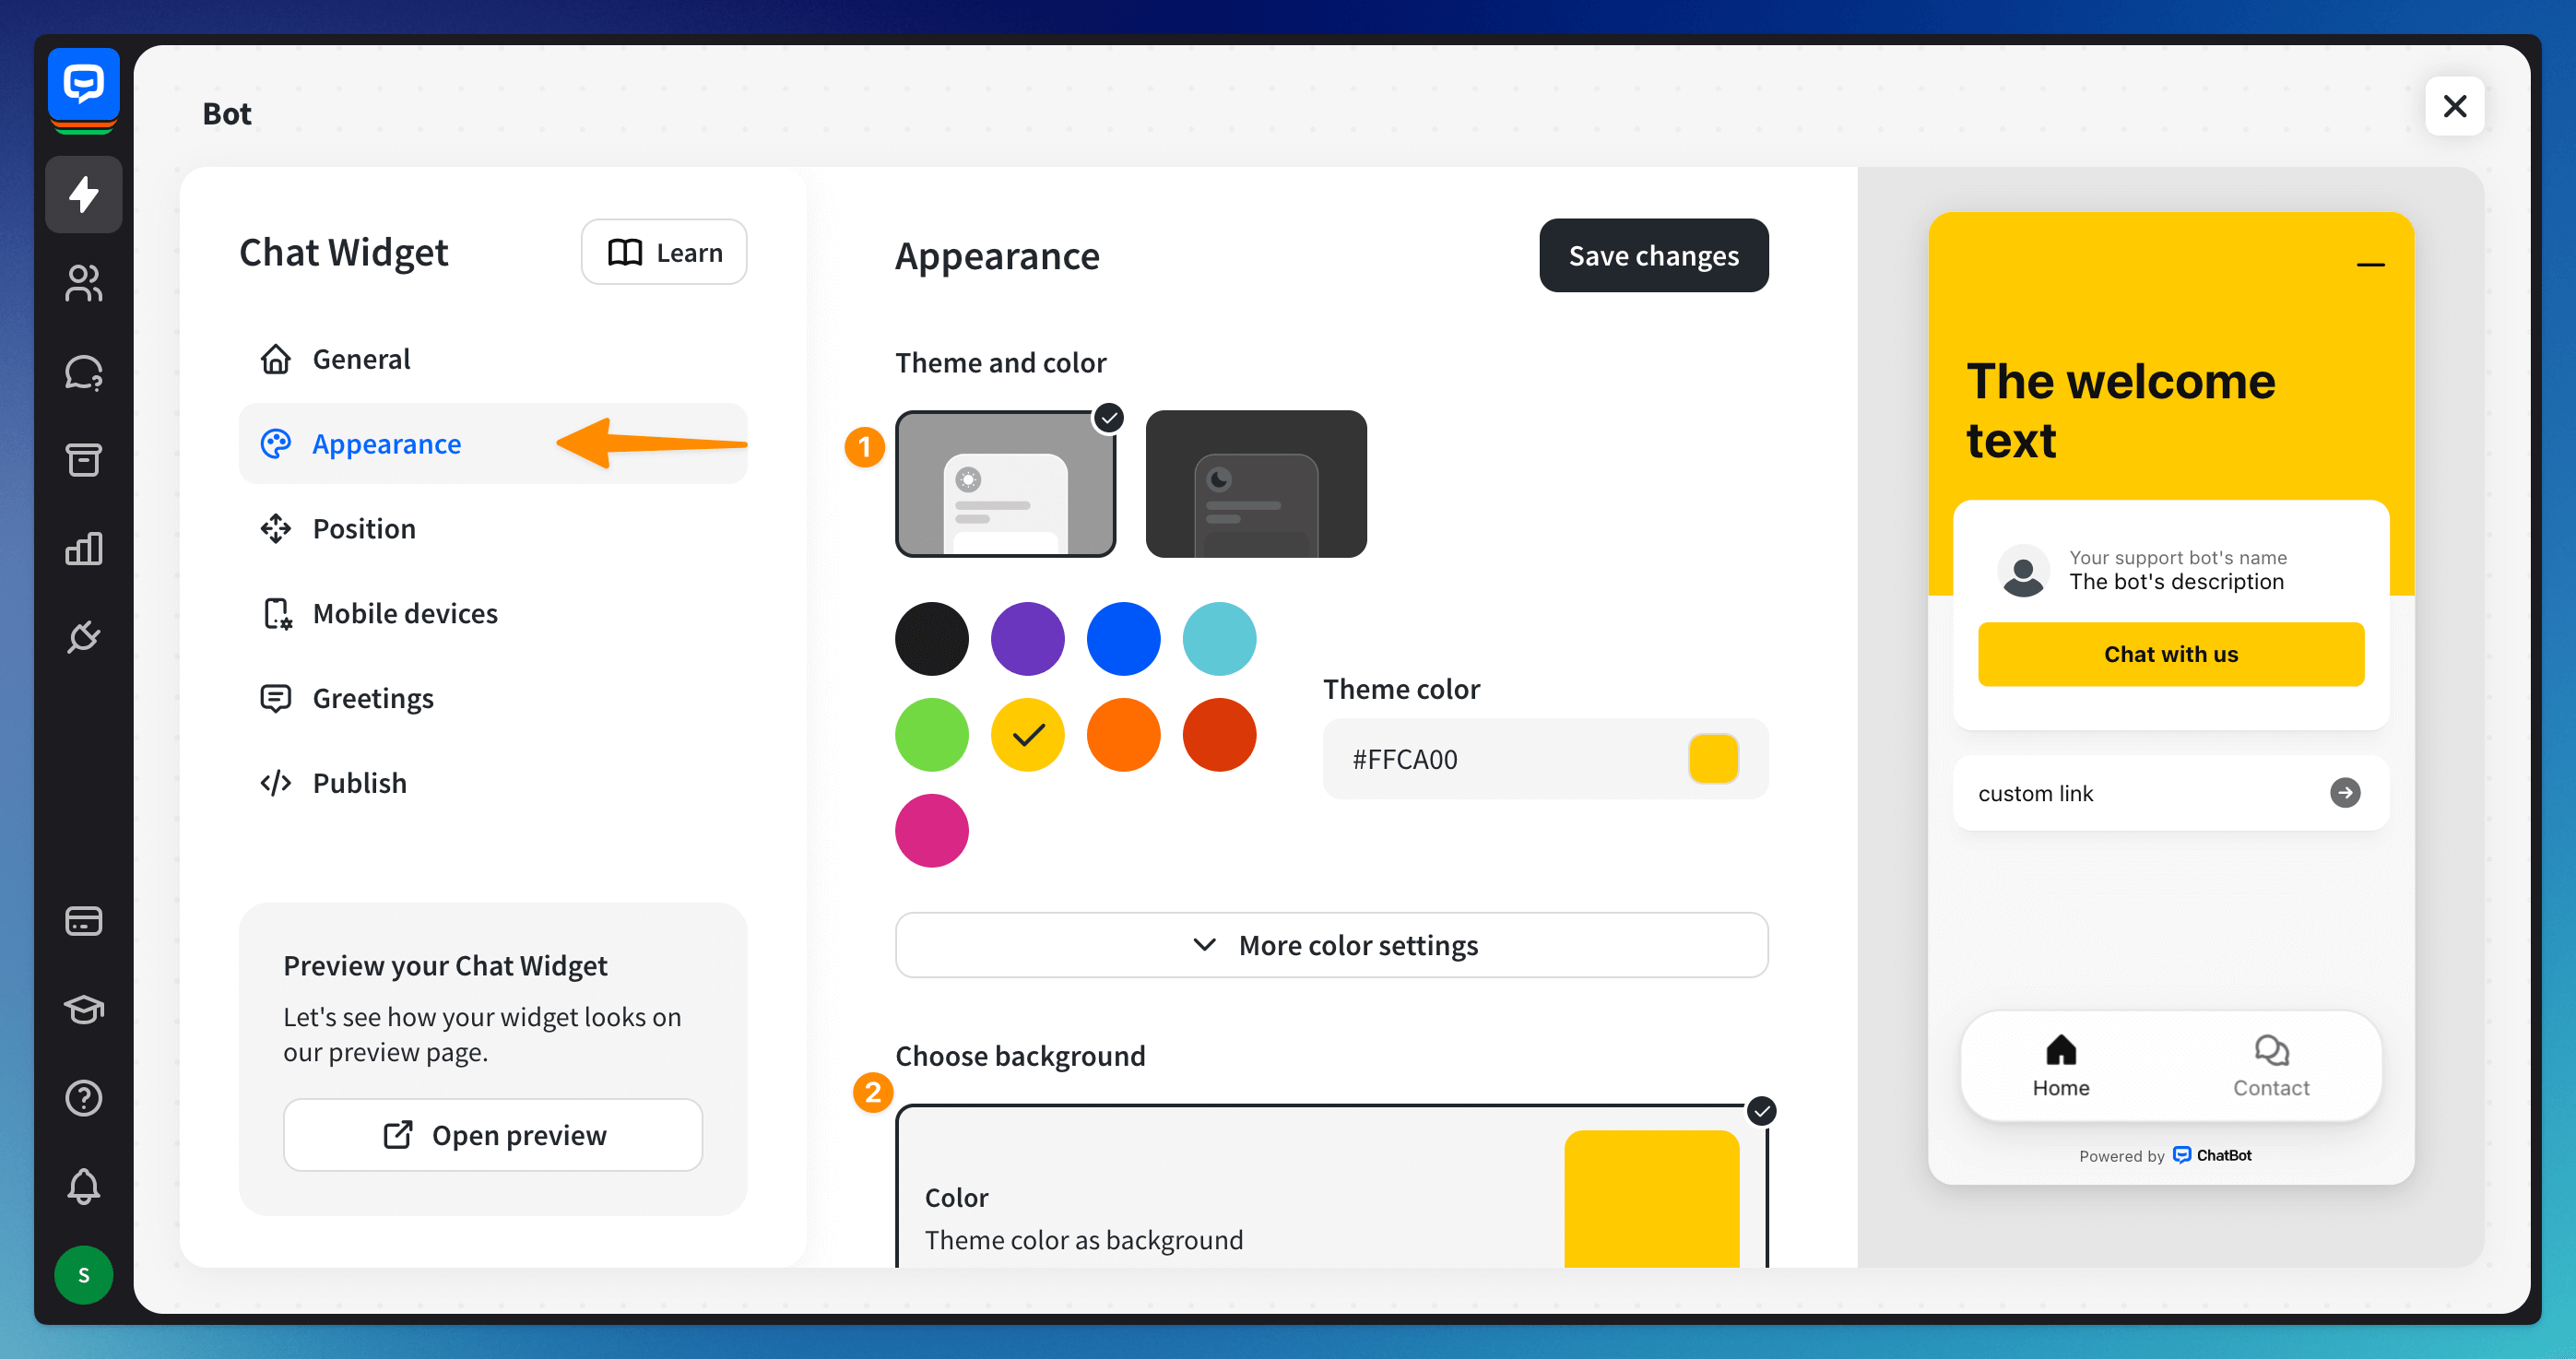
You can also choose the window background from a color or gradient or upload your background picture.
Position section
Decide where to place the chat widget on your site to benefit your users most. Choose whether you want the window on the left or right side of the screen and how far from the side and bottom it should be.

You can also use the default launch type and load the chat window automatically or use the custom launch and show the window only when you want it.
With the Default launch, the chat window will be displayed based on the Position and the Mobile devices section settings after the site finishes loading. If you set any greetings in the Greetings section, the message will be displayed alongside the minimized chat window based on your settings.
With the Custom launch, you set the rules for when the window will appear on your site. For example, you can customize the launch with coding to open the window only after the user clicks a button on your site.
With the Default launch, the chat window will be displayed based on the Position and the Mobile devices section settings after the site finishes loading. If you set any greetings in the Greetings section, the message will be displayed alongside the minimized chat window based on your settings.
With the Custom launch, you set the rules for when the window will appear on your site. For example, you can customize the launch with coding to open the window only after the user clicks a button on your site.
Mobile devices section
Decide if you want to keep chat widget enabled for users entering your site on mobile devices. You can also disable this option in this section.
You can choose to keep the same position as on the desktop (you can adjust the position in the Position section) or customize it.
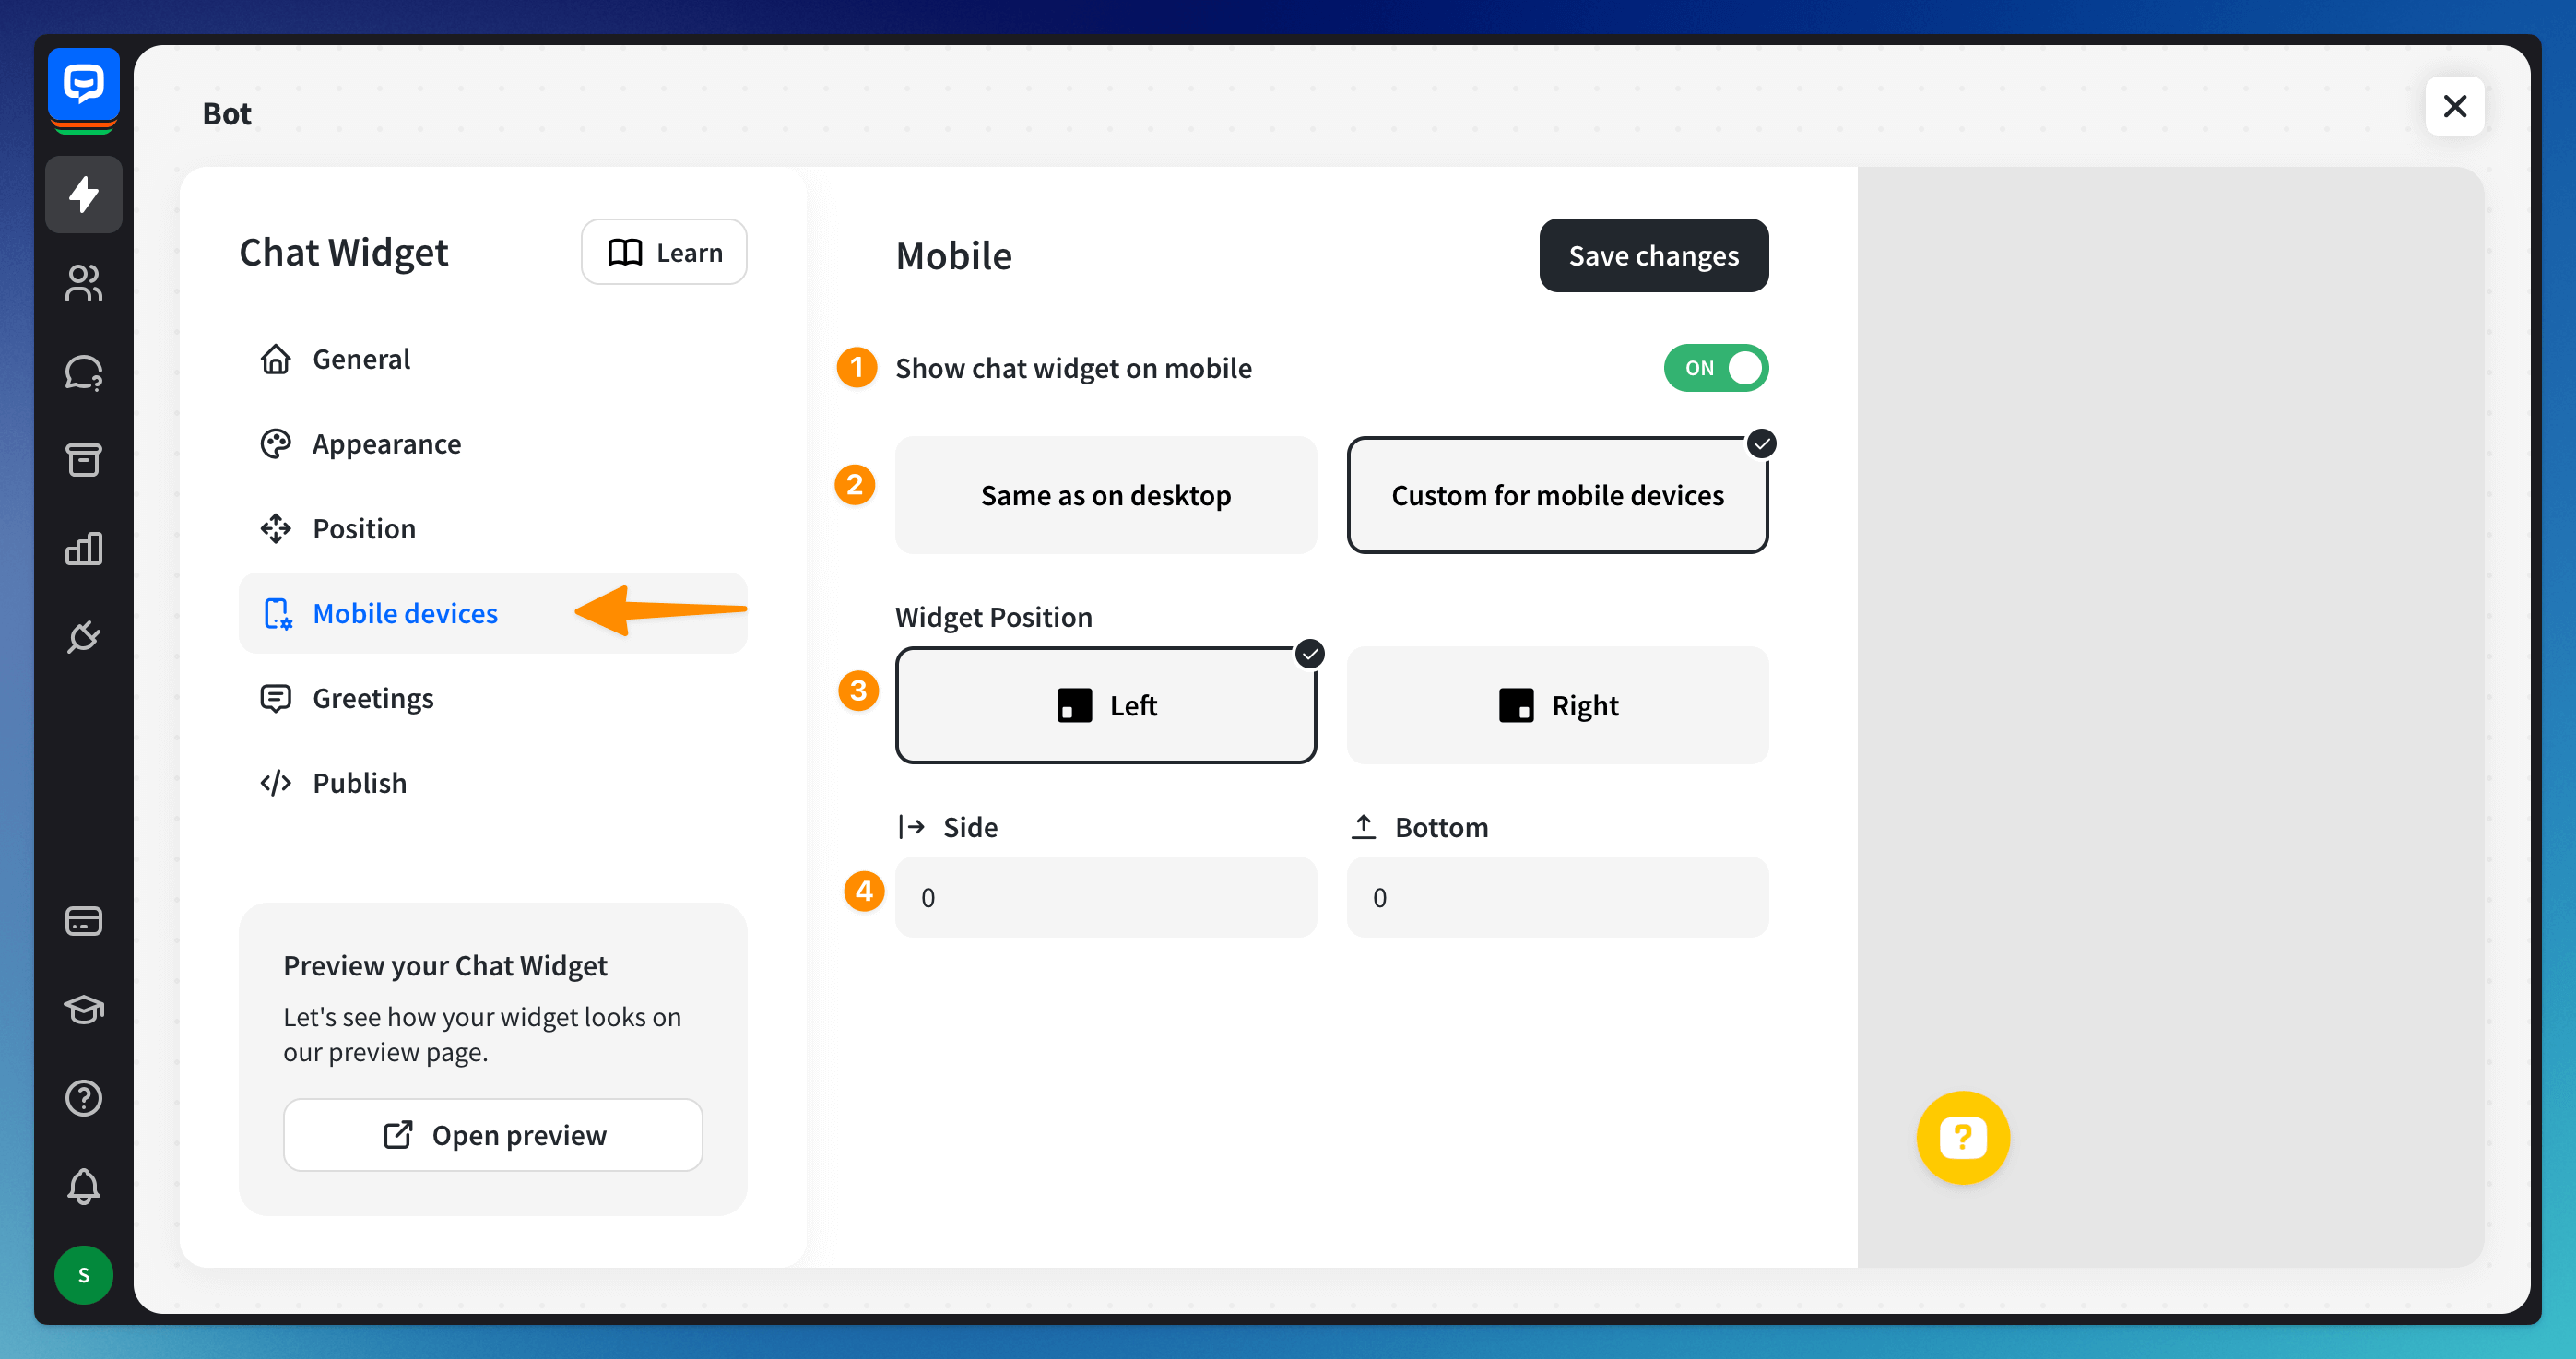
Decide if the chat widget should be displayed on the left or right side of the screen and how far from the side and bottom it should be.
Greetings section
Configure a greeting to capture your users’ attention and encourage them to chat — display a pop-up message above your website’s minimized Chat Widget icon.
Enter the greeting configurator by clicking the +Add greeting button. Add the name to recognize the greeting (it will not be displayed to the users) and the greeting message. Then, choose the conditions under which the message will be displayed.
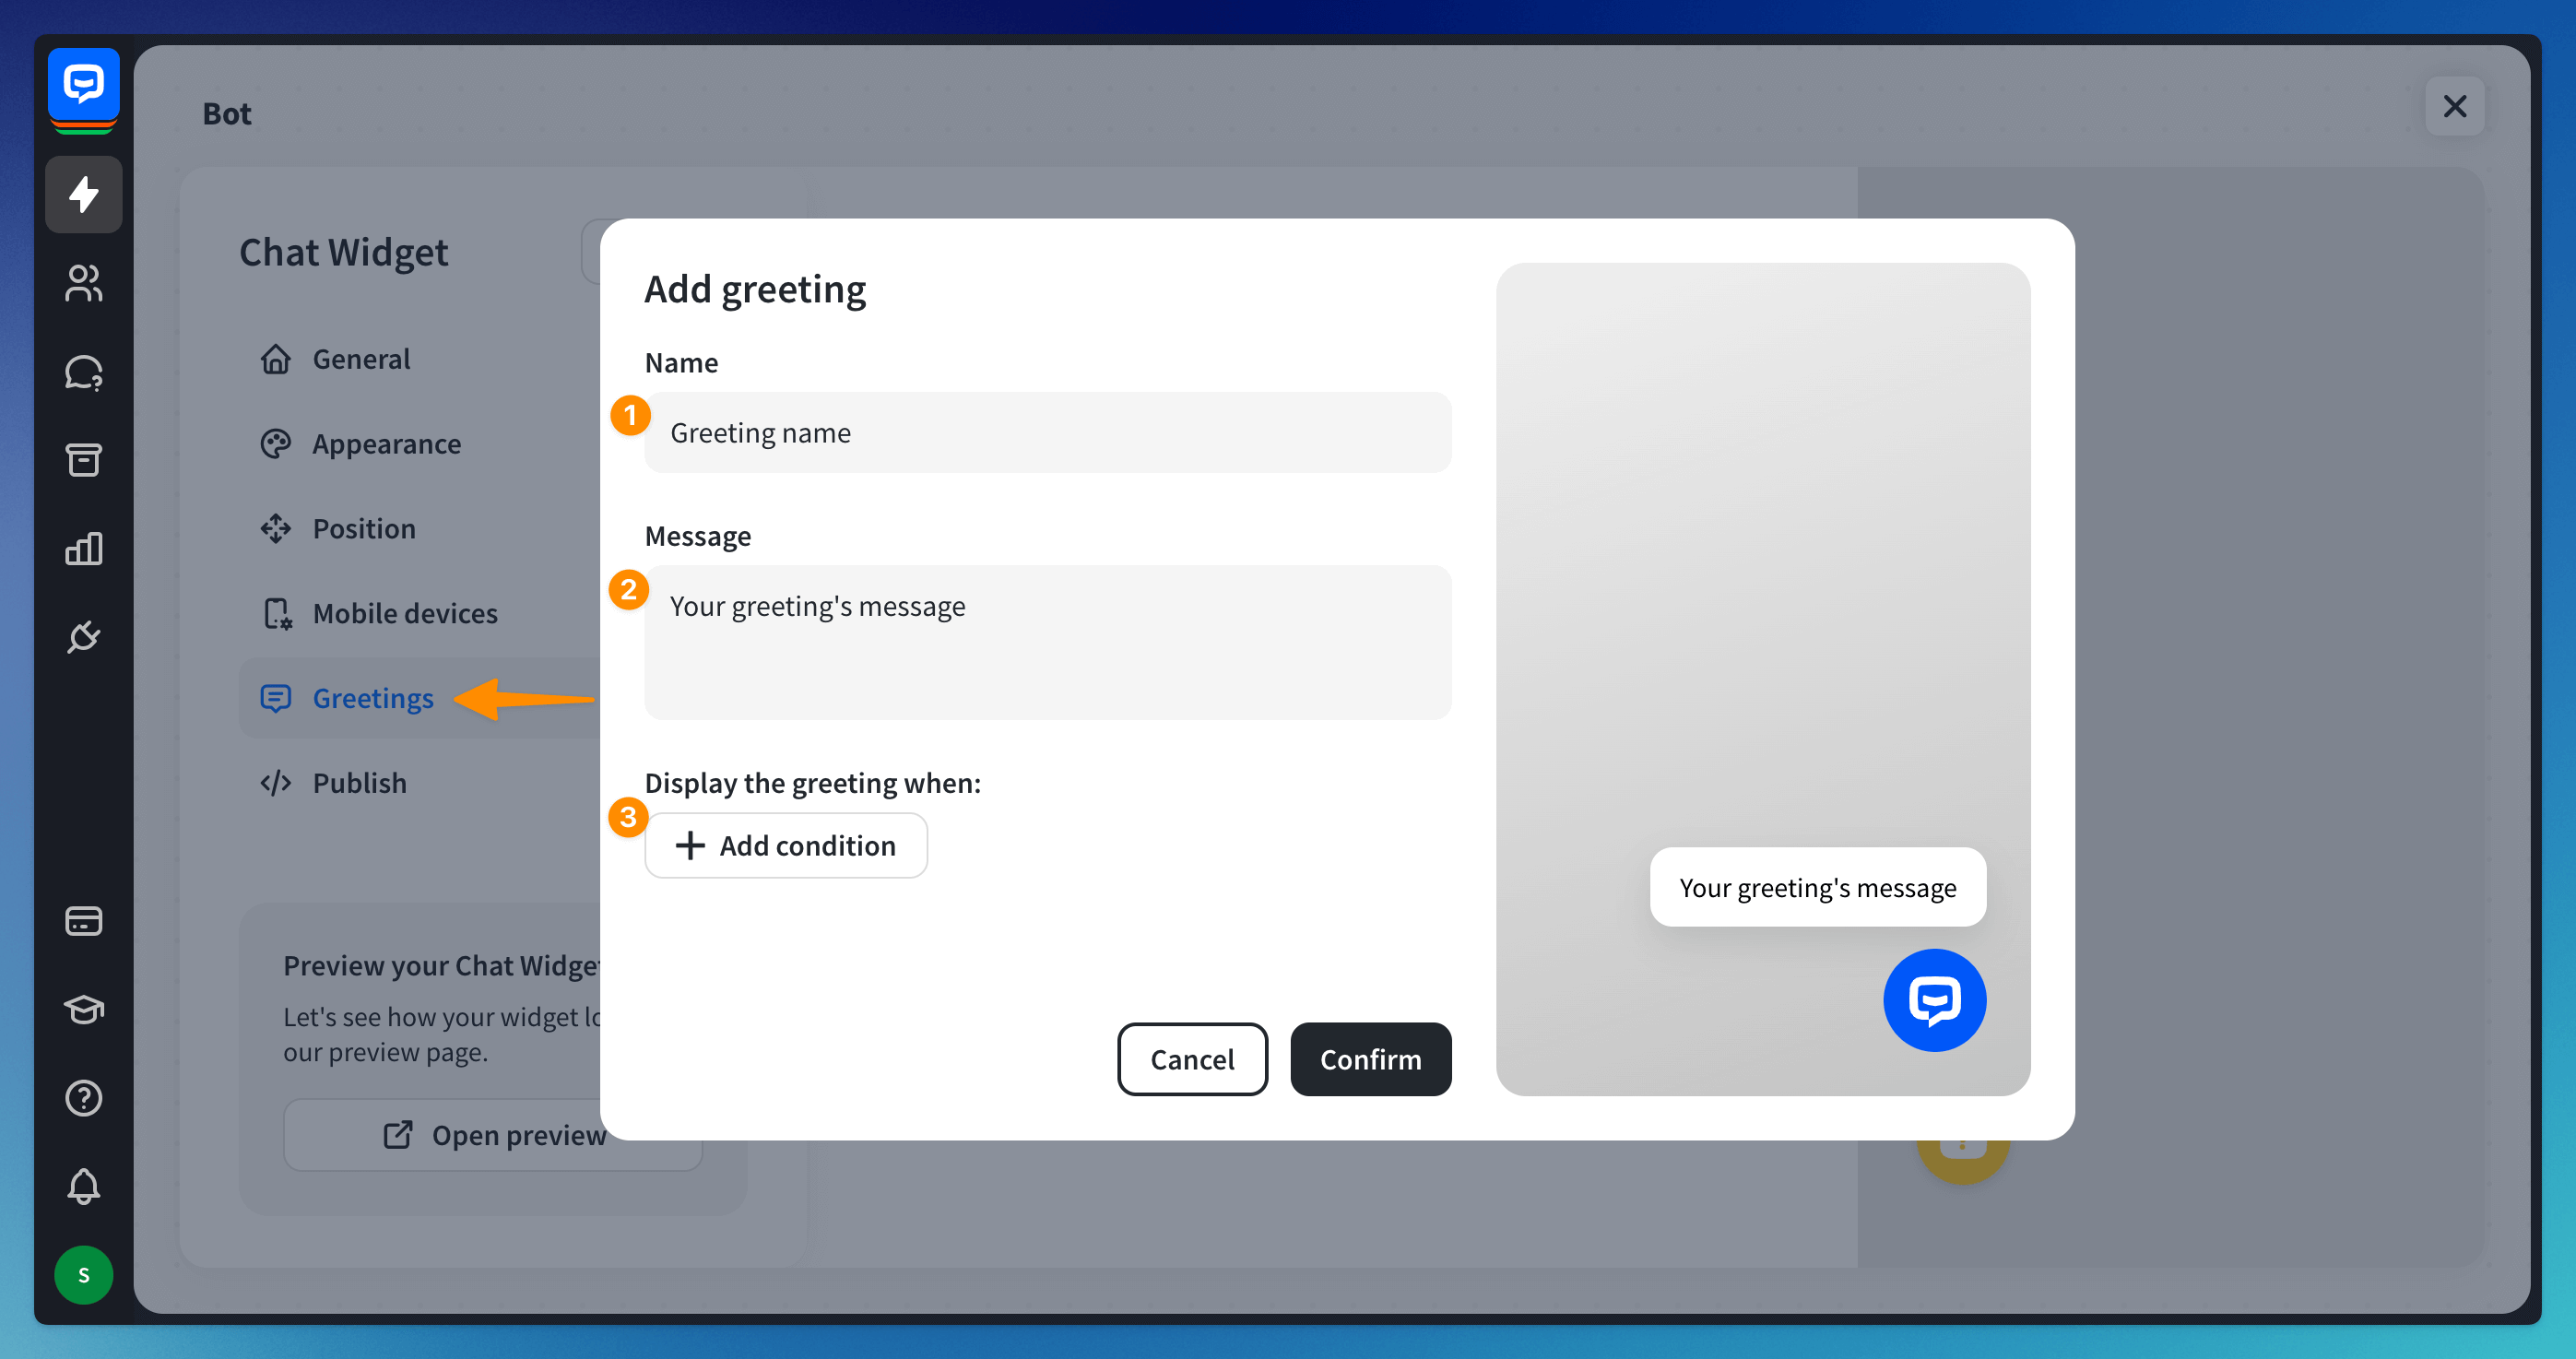
You can see how the message will look on your site on the right side of the window. Save the changes with the Confirm button.
Publish section
In this section, you will find the tracking code needed to install the bot on your site and the integrations list.
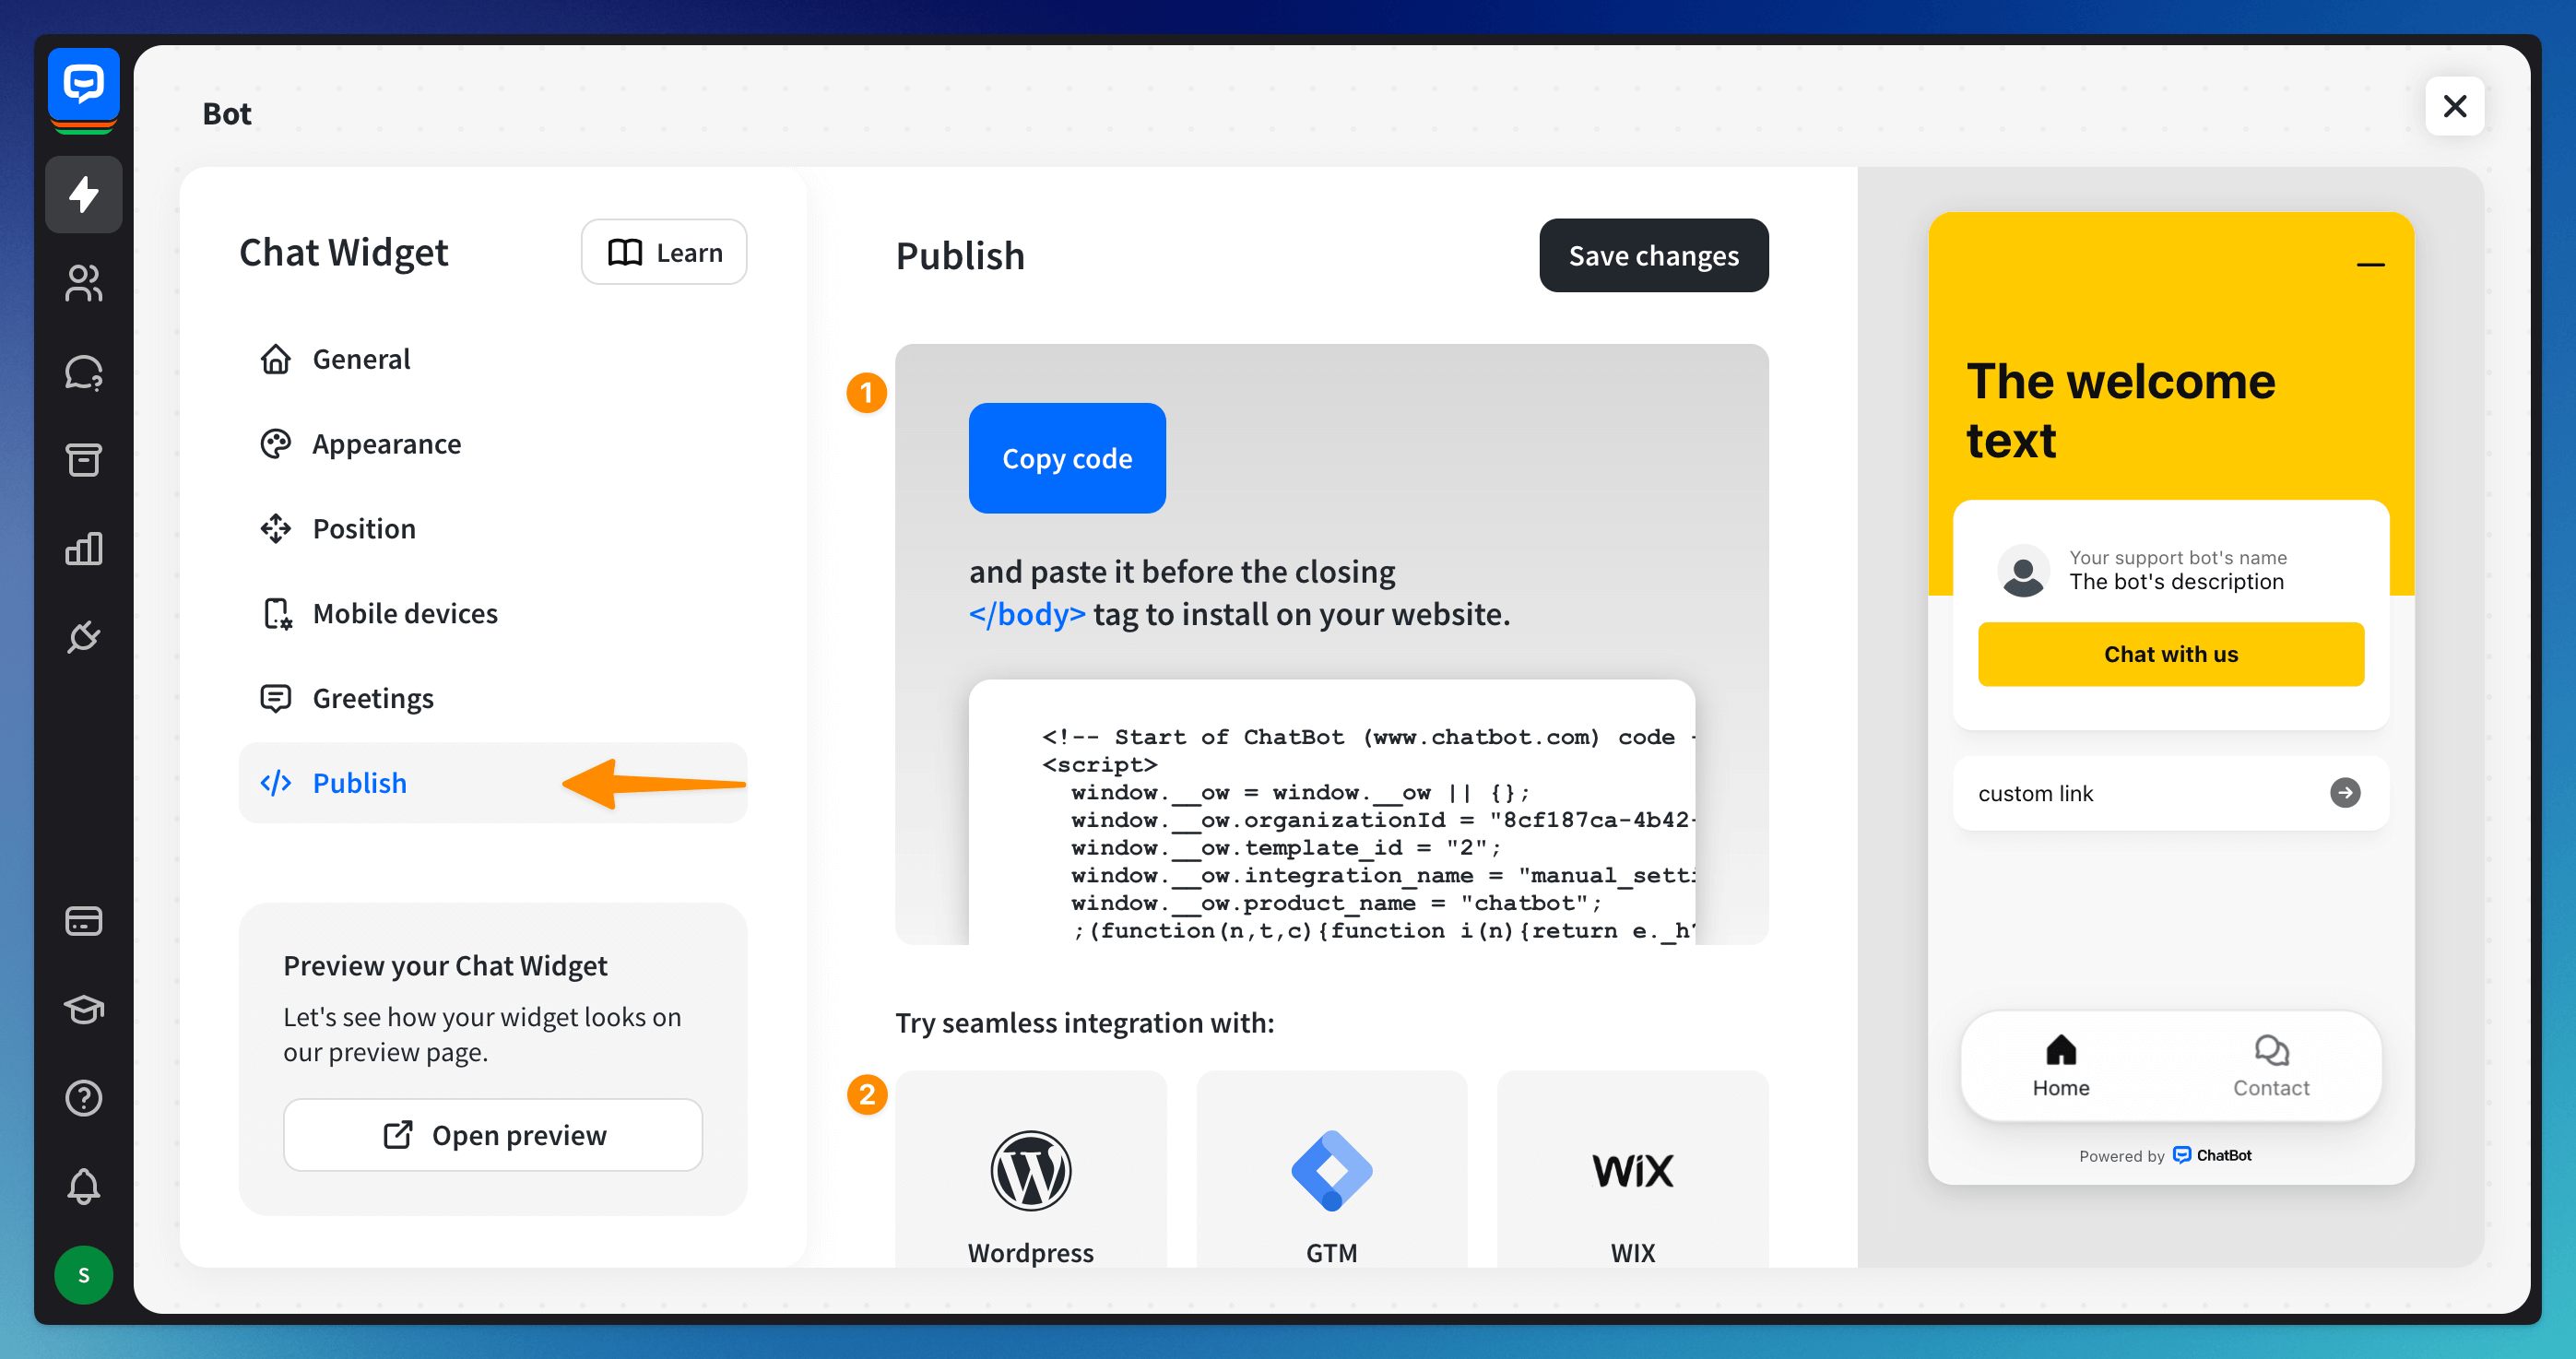
To integrate the bot with any of the integrations we offer, click on the integration box to see instructions or follow the instructions here:
WordPress, Google Tag Manager, Wix, Shopify, Squarespace, BigCommerce, Webflow
To integrate the bot with any of the integrations we offer, click on the integration box to see instructions or follow the instructions here:
WordPress, Google Tag Manager, Wix, Shopify, Squarespace, BigCommerce, Webflow
Install the bot on your site
To install the bot on your site, copy the code using the Copy code button. You should paste it into your site’s source code before the < / body > closing tag.
The Chat Widget can also be embedded as an element of the page. You can see how it looks here. The example code is available in our GitHub repository.
The repository contains an example code. To make it work on your site, you must change the widget code in the file. You can find it in the Publish section of the integration window.
The Chat Widget can also be embedded as an element of the page. You can see how it looks here. The example code is available in our GitHub repository.
The repository contains an example code. To make it work on your site, you must change the widget code in the file. You can find it in the Publish section of the integration window.
Preview your Chat Widget section
Testing is crucial for chatbot development. It lets you check your bot’s accuracy, speed, and usefulness. It also helps uncover issues like incomplete paths or bad user experience, which can negatively impact your bot’s adoption.
You can test the bot on the Preview page when all the changes are complete. This page allows you to chat with the bot and see all changes made to the chat widget.
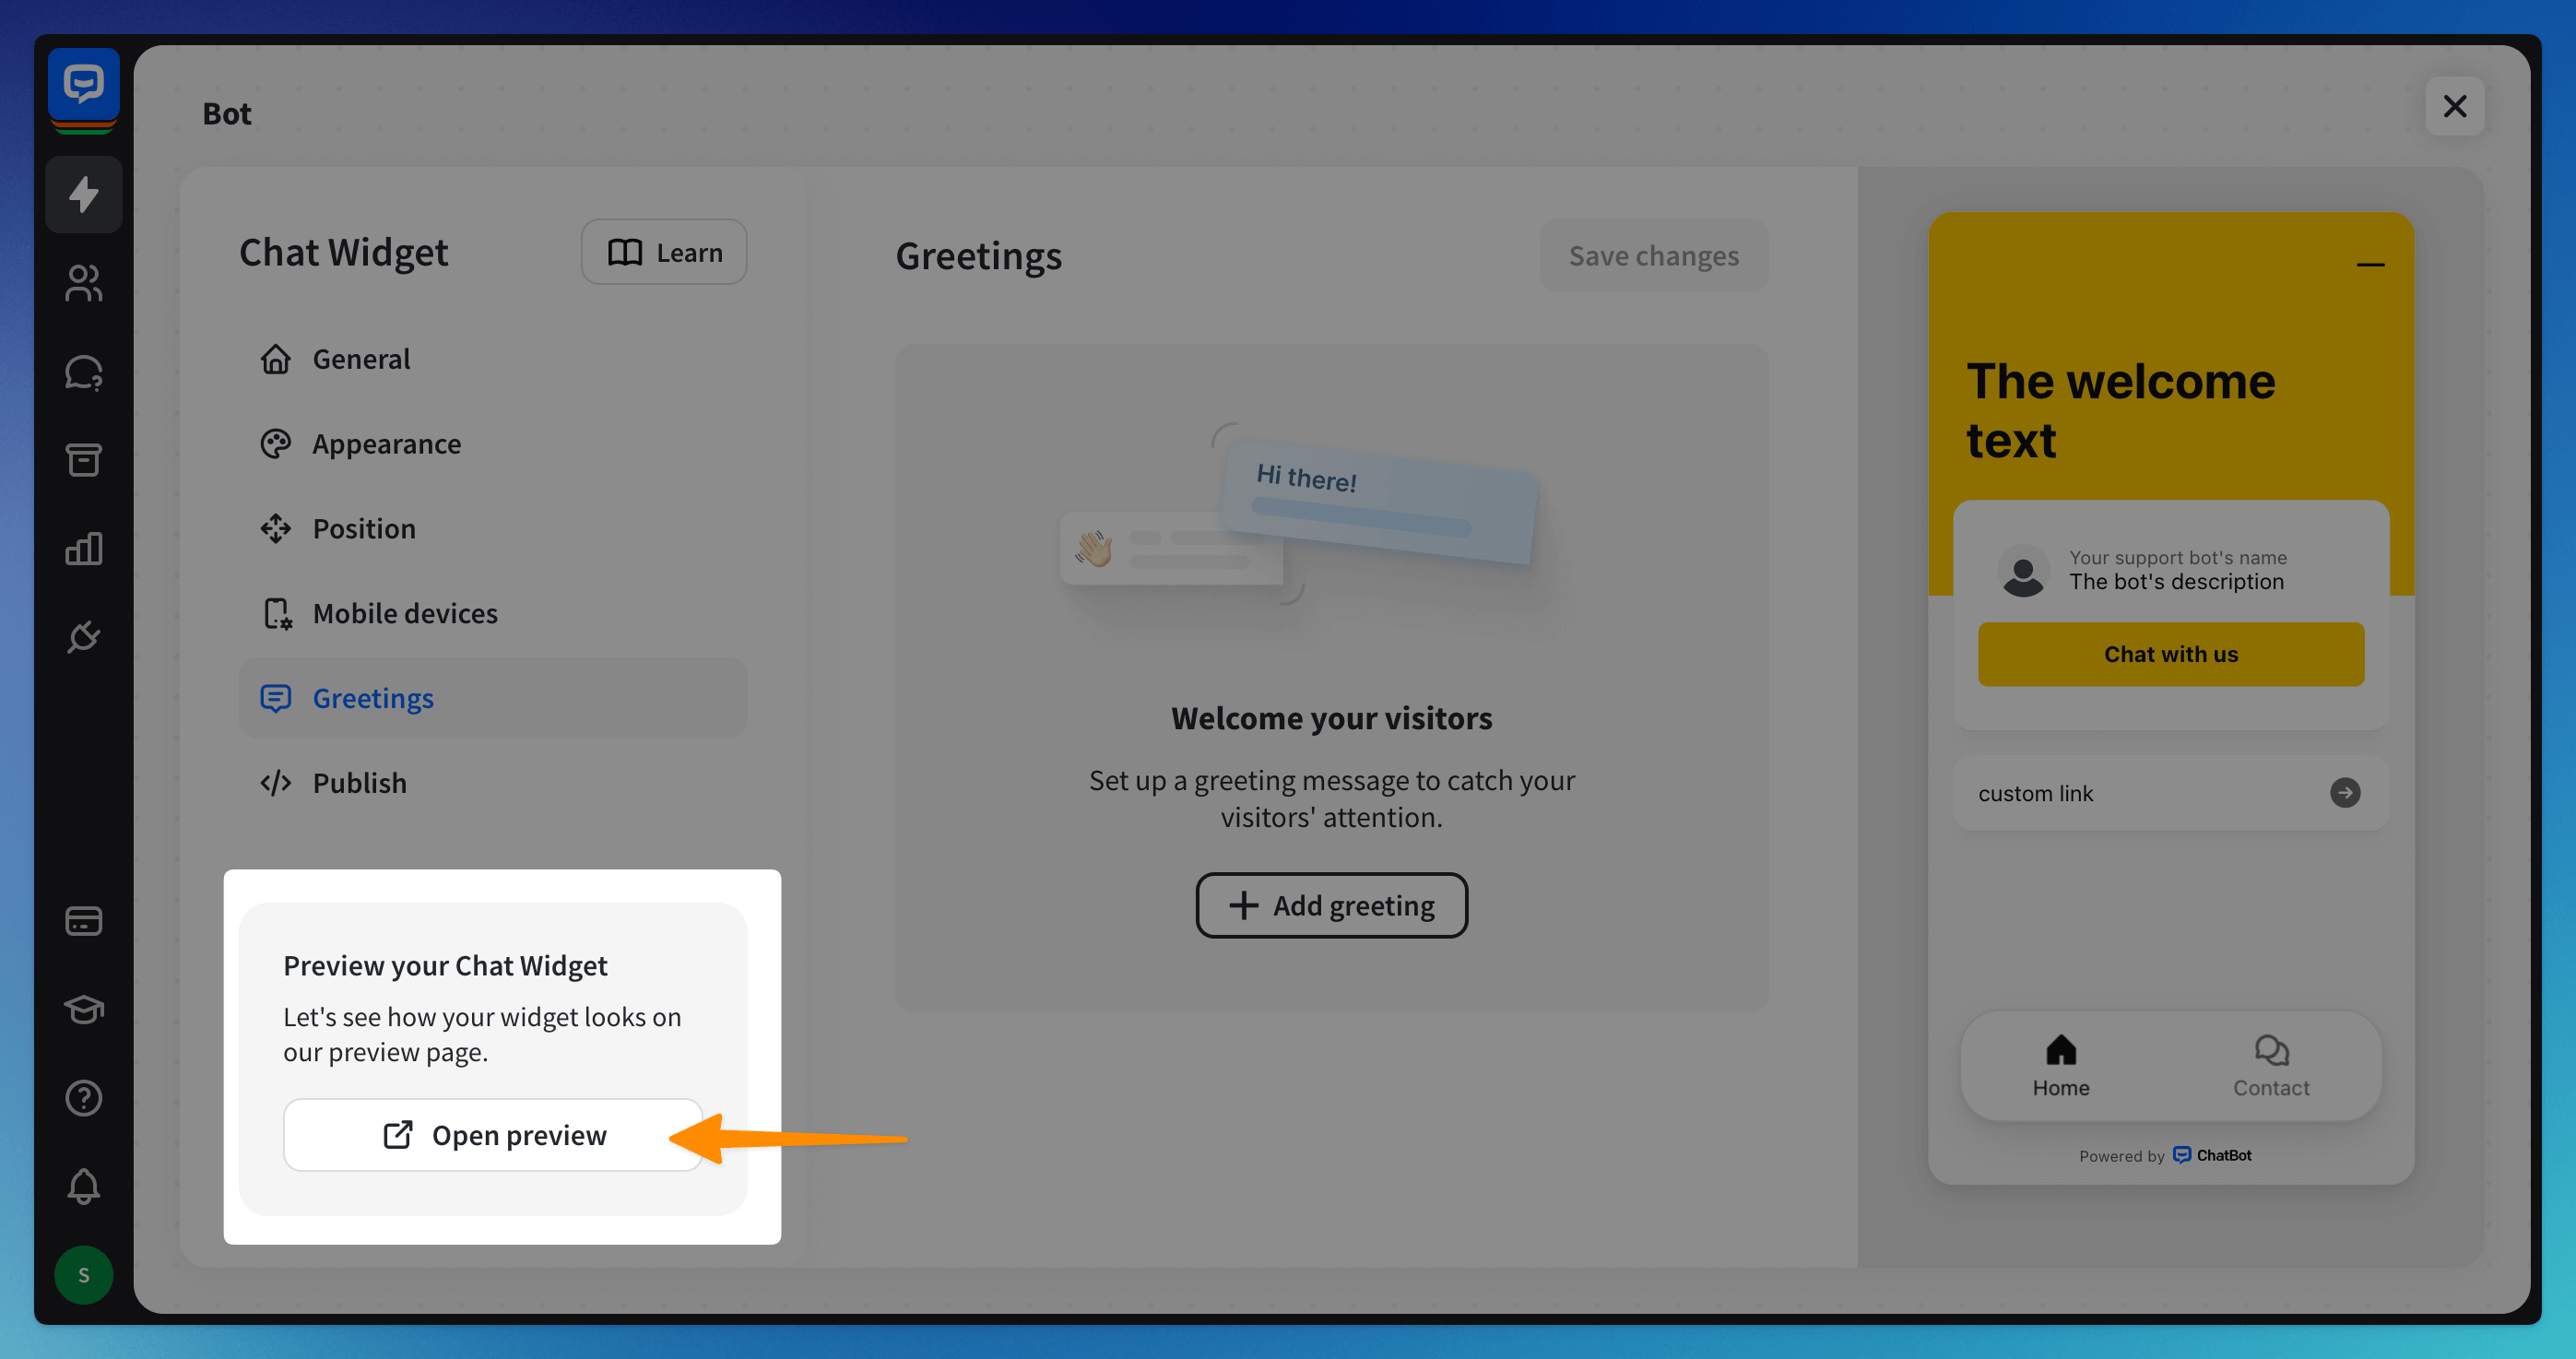
With the preview page, you can see how it will perform live on the page before you install the bot on your site. You can also see all the changes and adjust settings if needed.

How to disable Chat Widget on your site
To disable the bot (without removing the Chat Widget code from your site), go to the Chat Widget integration and switch the integration toggle to the off position.

Switch the toggle back to the on position to enable the bot on your site again.
How to delete Chat Widget from your site
To delete the integration from your site, delete the tracking code from the site’s source code or go to the Integrations tab from the side menu and choose Chat Widget from the list. Then, click the 3-dot symbol, and select the Delete integration option. Confirm.


Deleting the integration erases all the changes made to the Chat Widget and the widget itself from the site. You’ll need to configure it from scratch when you decide to enable the Chat Widget again on your site.
Disabling the bot turns it off on the site but leaves all the settings intact in the ChatBot.com app.
Deleting the integration erases all the changes made to the Chat Widget and the widget itself from the site. You’ll need to configure it from scratch when you decide to enable the Chat Widget again on your site.
Disabling the bot turns it off on the site but leaves all the settings intact in the ChatBot.com app.
Read more: